ThinX OS ThinX OS ThinX OS ThinX OS ThinX OS ThinX OS ThinX OS
What is ThinX OS? Qu'est-ce que ThinX OS ? Was ist ThinX OS? ¿Qué es ThinX OS? O que é o ThinX OS? Che cos'è ThinX OS? מה זה ThinX OS?
ThinX OS is ChipPC's purpose-built embedded Linux operating system for thin client devices. It is optimized for zero-touch deployment, centralized management, and secure remote access to virtual desktops and applications.
ThinX OS boots in seconds, requires no local user management, and is fully controlled by the Xcalibur management console. Every setting — from display resolution to VNC passwords — can be pushed remotely from Xcalibur without any local intervention.
To reinstall or recover the OS from a USB stick (e.g. with Rufus on Windows), follow Recovery USB (Rufus) in the sidebar below.
- Based on a hardened Linux kernel with read-only root filesystem
- Supports RDP, Citrix ICA/HDX, VMware Horizon, and VNC protocols
- Manages connections, auto-login, and screensaver from a single UI
- Full integration with Xcalibur for remote tasks, monitoring, and audit
ThinX OS est le système d'exploitation Linux embarqué de ChipPC, conçu spécifiquement pour les terminaux légers. Optimisé pour le déploiement sans intervention, la gestion centralisée et l'accès distant sécurisé aux bureaux virtuels et applications.
ThinX OS démarre en quelques secondes, ne nécessite aucune gestion locale des utilisateurs et est entièrement contrôlé par la console Xcalibur. Chaque paramètre peut être poussé à distance depuis Xcalibur.
Pour réinstaller ou restaurer le système depuis une clé USB (ex. Rufus sous Windows), voir la section Clé USB de réinstallation (Rufus) dans le menu latéral.
- Noyau Linux durci avec système de fichiers racine en lecture seule
- Protocoles RDP, Citrix ICA/HDX, VMware Horizon et VNC
- Connexions, auto-login et économiseur d'écran gérés depuis une seule UI
- Intégration complète avec Xcalibur pour les tâches distantes, la surveillance et l'audit
ThinX OS ist ChipPCs speziell entwickeltes eingebettetes Linux-Betriebssystem für Thin Clients. Es ist für Zero-Touch-Deployment, zentrale Verwaltung und sicheren Remote-Zugriff optimiert.
Neuinstallation per USB: Abschnitt Wiederherstellungs-USB (Rufus).
ThinX OS es el sistema operativo Linux embebido de ChipPC para thin clients. Optimizado para despliegue sin intervención, gestión centralizada y acceso remoto seguro.
Reinstalación desde USB: USB de recuperación (Rufus).
ThinX OS é o sistema operativo Linux embebido da ChipPC para thin clients. Otimizado para implementação zero-touch, gestão centralizada e acesso remoto seguro.
Reinstalação a partir de USB: USB de recuperação (Rufus).
ThinX OS è il sistema operativo Linux integrato di ChipPC per thin client. Ottimizzato per il deployment zero-touch, la gestione centralizzata e l'accesso remoto sicuro.
Reinstallazione da USB: USB di ripristino (Rufus).
ThinX OS היא מערכת ההפעלה המוטמעת של ChipPC לטרמינלים קלים (thin clients). מיועדת לפריסה ללא מגע, ניהול מרכזי וגישה מרחוק מאובטחת.
התקנה מחדש מ-USB: אמצעי התקנה ב-USB (Rufus).
Reinstall ThinX OS from USB (Rufus) Réinstaller ThinX OS depuis une clé USB (Rufus) ThinX OS per USB neu installieren (Rufus) Reinstalar ThinX OS desde USB (Rufus) Reinstalar o ThinX OS a partir de USB (Rufus) Reinstallare ThinX OS da USB (Rufus) התקנה מחדש של ThinX OS מ-USB (Rufus)
Use a prepared USB stick to restore or reinstall ThinX OS on a ChipPC thin client. The steps below use Rufus on a Windows PC (common and well-supported). On Linux or macOS, use equivalent tooling only if your image format and documentation allow it.
Step 1: Preparing the USB drive
- Download the image file — Obtain the official ThinX OS image from the ChipPC support portal or from the installation package your vendor supplied. Use only trusted sources. If ChipPC publishes a SHA-256 checksum for the file, verify it after download (e.g. built-in Windows utility or
sha256sumon Linux) before writing. - Burn the image with Rufus
- Launch Rufus.
- Under Boot selection, choose the ThinX OS image file you downloaded.
- Select the correct USB device in the device list (double-check the drive letter to avoid overwriting the wrong disk).
- Click Start. If Rufus asks for an ISO vs DD (disk image) mode, pick the option described in the ChipPC image notes (wrong mode can make the stick unbootable).
- Confirm any prompts and wait until the operation completes successfully; use Safely Remove / eject before unplugging.
- Verify the medium — Ensure the USB stick has enough capacity for the image. If Rufus offers a filesystem choice compatible with your image, prefer FAT32 when the documentation recommends it; otherwise follow the image provider’s notes (some images require a specific partition scheme such as MBR/GPT — use what ChipPC specifies for your model).
Linux / macOS: use a tool recommended in the image readme (e.g. graphical imager or vendor script). Raw dd can overwrite the wrong disk — always triple-check the output device path.
Step 2: Booting from the USB drive
- Connect the USB drive — Insert the prepared USB stick into a USB port on the target thin client (a USB 2.0 port can be more reliable on older firmware if USB 3 fails to appear in the boot menu).
- Open the boot menu — Power on (or reboot) the system. During POST, press F7 repeatedly to open the Boot Menu on many ChipPC units. Select the USB entry, then press Enter to boot from it.
Troubleshooting
- USB not listed — Try another port, a smaller-capacity stick, or disable Fast Boot / enable full POST delay in firmware if available.
- Secure Boot — If the installer does not start, temporarily disable Secure Boot in firmware only if ChipPC documentation allows it for this image.
- After install — Remove the USB when prompted or after first successful internal boot so the device does not loop on the installer.
Pour restaurer ou réinstaller ThinX OS, préparez une clé USB amorçable. La procédure ci-dessous utilise Rufus sous Windows.
Étape 1 : préparer la clé USB
- Télécharger l’image — Récupérer l’image officielle ThinX OS sur le portail support ChipPC ou auprès de la source fournie avec votre matériel. Si ChipPC publie une empreinte SHA-256, vérifiez-la après téléchargement avant gravure.
- Gravure avec Rufus — Lancer Rufus ; sélectionner le fichier image ThinX OS ; choisir la bonne clé USB ; cliquer sur Démarrer. Si Rufus propose ISO vs mode image disque (DD), choisir l’option indiquée dans la notice ChipPC. Attendre la fin sans erreur ; éjecter la clé proprement.
- Vérifications — Capacité suffisante ; si la doc impose FAT32 ou un schéma MBR/GPT, appliquer les options indiquées dans Rufus ou la notice.
Linux / macOS : suivre l’outil ou la procédure du fichier readme livré avec l’image ; la commande dd peut effacer le mauvais disque si le périphérique de sortie est mal choisi.
Étape 2 : démarrer sur la clé
- Brancher la clé sur le terminal (un port USB 2.0 peut mieux être reconnu sur certains firmwares).
- Allumer ou redémarrer ; pendant l’affichage du logo / POST, appuyer plusieurs fois sur F7 pour ouvrir le menu de démarrage ; choisir l’entrée USB et valider.
Dépannage
- USB absent du menu — autre port, autre clé, ou désactiver le démarrage rapide dans le firmware si possible.
- Secure Boot — désactiver temporairement Secure Boot seulement si la documentation ChipPC l’autorise pour cette image.
- Après installation — retirer la clé une fois l’OS démarré depuis le disque interne pour éviter une boucle sur l’installateur.
Zur Neuinstallation von ThinX OS erstellen Sie einen bootfähigen USB-Stick. Unter Windows eignet sich Rufus: offizielles Image vom ChipPC-Support laden (optional SHA-256 prüfen), in Rufus auswählen, USB-Laufwerk wählen, Start klicken; bei Abfrage ISO vs DD-Modus die ChipPC-Vorgabe wählen. Kapazität und FAT32/Partitionsschema gemäß Dokumentation. Hinweis: Neuinstallation löscht in der Regel lokale Daten. Beim Boot oft F7, sonst F12/F11/Esc; ggf. Secure Boot laut Handbuch, USB-2.0-Port probieren.
Para reinstalar ThinX OS, prepare un USB de arranque con Rufus en Windows: descargue la imagen oficial del soporte ChipPC (verifique SHA-256 si se publica), selecciónela en Rufus, elija el pendrive y pulse Inicio; si Rufus ofrece ISO vs imagen DD, siga la guía ChipPC. La reinstalación suele borrar el almacenamiento interno. Compruebe capacidad y FAT32 si procede. Al arrancar, F7 para el menú de arranque (o F12, F11, Esc); pruebe puerto USB 2.0 o desactive Secure Boot solo si la documentación lo permite.
Para reinstalar o ThinX OS, crie um USB arrancável com o Rufus no Windows: obtenha a imagem oficial no suporte ChipPC (valide SHA-256 se existir), selecione-a no Rufus, escolha o dispositivo USB e clique em Começar; em ISO vs DD, siga a nota ChipPC. A reinstalação apaga normalmente o armazenamento interno. No arranque, F7 (ou F12, F11, Esc); experimente USB 2.0 ou Secure Boot apenas conforme a documentação.
Per reinstallare ThinX OS preparare una chiavetta avviabile con Rufus su Windows: immagine ufficiale dal supporto ChipPC (verificare SHA-256 se pubblicato), in Rufus scegliere l’unità corretta e Avvia; in caso di scelta ISO vs DD seguire la guida ChipPC. La reinstallazione cancella di solito lo storage interno. All’avvio F7 (o F12, F11, Esc); provare porta USB 2.0 o Secure Boot solo se consentito dalla documentazione.
להתקנה מחדש של ThinX OS יש להכין דיסקון USB הניתן לאתחול באמצעות Rufus ב-Windows: הורידו את קובץ התמונה הרשמי מפורטל התמיכה של ChipPC (אימות SHA-256 אם פורסם), בחרו אותו ב-Rufus, בחרו את ה-USB הנכון והתחילו את השריפה. ההתקנה מחדש בדרך כלל מוחקת את האחסון הפנימי. באתחול לחצו שוב ושוב על F7 לתפריט אתחול (או F12, F11, Esc); נסו גם יציאת USB 2.0 או כיבוי Secure Boot רק לפי המסמך.
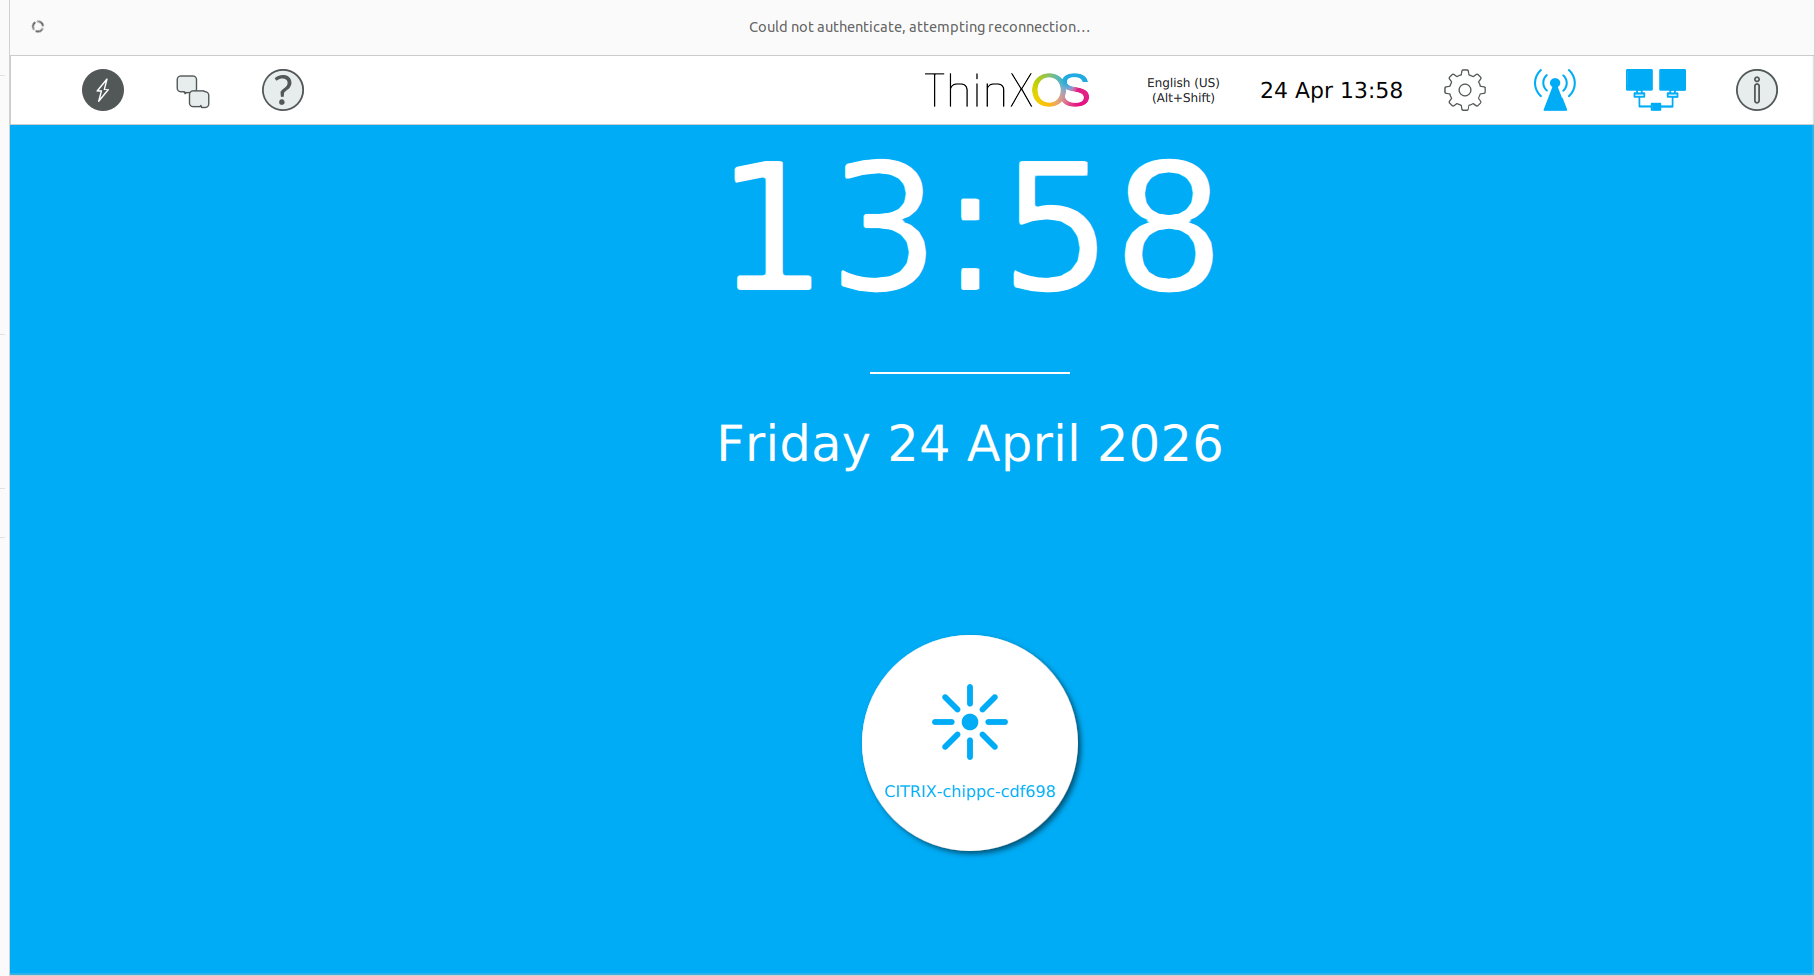
First boot: ThinX OS Setup Premier démarrage : assistant ThinX OS Erster Start: ThinX OS Setup Primer arranque: asistente ThinX OS Primeiro arranque: assistente ThinX OS Primo avvio: configurazione ThinX OS אתחול ראשון: אשף ThinX OS
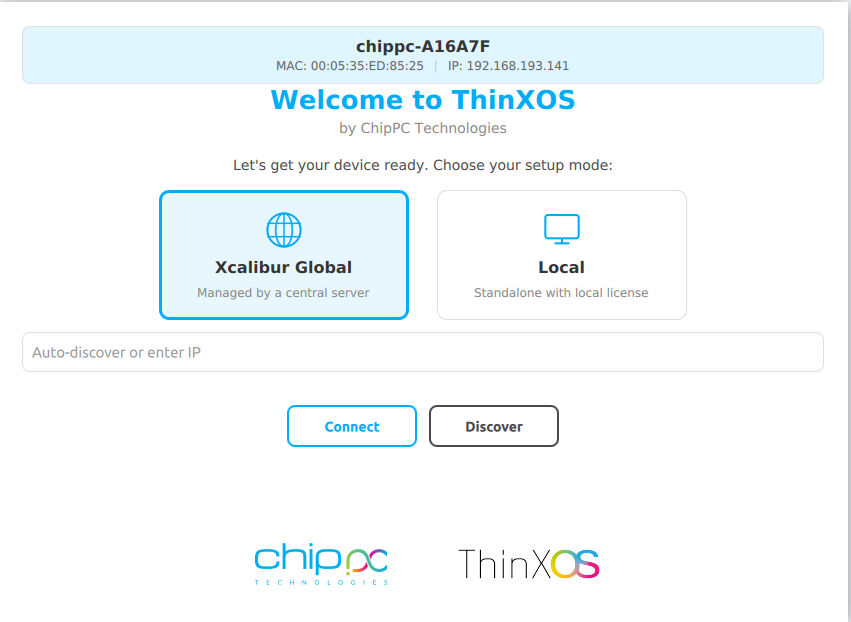
On first boot, the thin client runs ThinX OS Setup (ThinXOS Setup window) from the ChipPC client (client/licensemanager in the chippcapp sources). You choose how the device is licensed and managed.
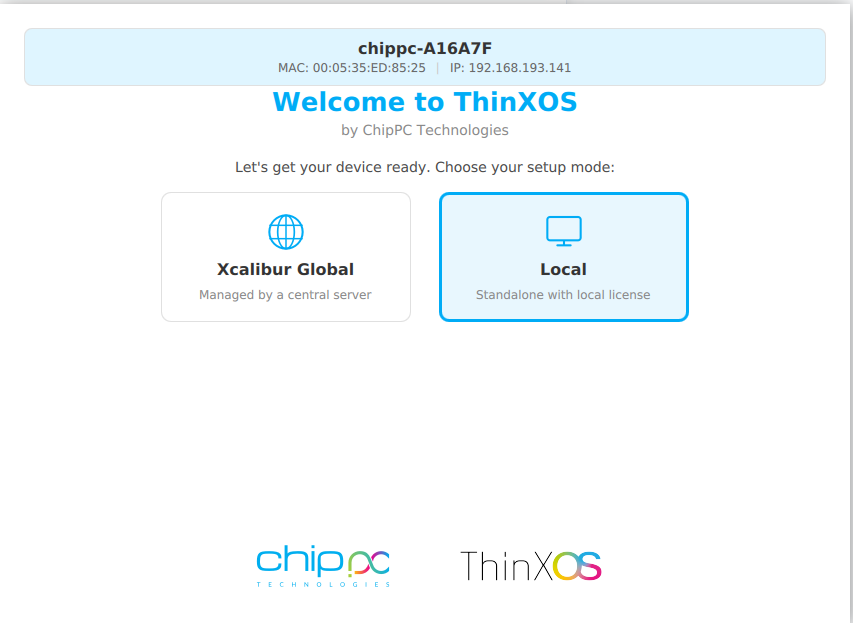
Without Xcalibur (standalone / local license)
Select Local — Standalone with local license. The device talks to the ChipPC license server over HTTPS:
- Endpoint:
https://license.chippc.com(outbound TCP 443 must be allowed). - Device identity: serial string
ProcessorId-MAC(used for lookup and registration). - Automatic check: the wizard tries to fetch an existing license for this device.
- Register this PC: registers the device with the license server (extended warranty / support flow).
- License code: enter
XXXX-XXXX-XXXXand click Apply to bind a code to this device via the server.
If the server cannot be reached, use a code only when your process allows offline steps; otherwise fix DNS/firewall first.
With Xcalibur (managed)
Select Xcalibur Global — Managed by a central server. Enter your Xcalibur server address (hostname or IP) or use discovery.
- Connect: uses the value in the field. If the field is empty, discovery starts automatically.
- Discover: finds the Xcalibur server on the LAN. The client tries, in order: PSK discovery on
https://<IP>:1013/psk-discoverywhen you typed an IP, then UDP broadcast to port 1012, then a subnet scan on the same /24. - On success, the management URL is stored as
wss://<host>:1013/api/v1/ws(defaults applied when the port/path are omitted). - The client then activates and waits for license approval from the Xcalibur server.
Open on the network: UDP 1012 (broadcast discovery), TCP 1013 (HTTPS discovery and WSS management, depending on deployment), and 443 to license.chippc.com for standalone licensing.
For pool-based and MAC-based licenses uploaded and assigned in the Xcalibur console, see Licenses (Chapter 3). The first-boot wizard here is the on-device path before the agent is fully enrolled.
Au premier démarrage, l’assistant ThinX OS Setup (fenêtre du client ChipPC, sources licensemanager) permet de choisir le mode de licence.
Sans Xcalibur (licence locale)
Choisir Local — poste autonome. Connexion au serveur de licences ChipPC https://license.chippc.com (HTTPS 443). Identité ProcessorId-MAC, vérification automatique, bouton Register this PC, saisie du code XXXX-XXXX-XXXX puis Apply.
Avec Xcalibur
Choisir Xcalibur Global. Saisir l’adresse du serveur ou lancer Discover : PSK sur https://IP:1013/psk-discovery, diffusion UDP port 1012, puis balayage du sous-réseau. Puis activation / attente d’approbation côté serveur Xcalibur.
Beim ersten Start öffnet sich ThinX OS Setup. Local: Lizenzserver license.chippc.com (Port 443). Xcalibur Global: Verwaltungsserver; Discovery UDP 1012, HTTPS 1013 für PSK-Discovery.
En el primer arranque se abre ThinX OS Setup. Local: servidor de licencias license.chippc.com (443). Xcalibur Global: descubrimiento UDP 1012 y HTTPS 1013.
No primeiro arranque: ThinX OS Setup. Local: license.chippc.com (443). Xcalibur Global: descoberta UDP 1012, HTTPS 1013.
Al primo avvio: ThinX OS Setup. Local: license.chippc.com (443). Xcalibur Global: discovery UDP 1012, HTTPS 1013.
באתחול ראשון נפתח אשף ThinX OS Setup. מצב Local: שרת רישיונות license.chippc.com (443). מצב Xcalibur Global: גילוי UDP על פורט 1012 ו-HTTPS על 1013.
client/Logo-ThinXOS.png / ui.qrc)Logo officiel ThinX OS (identique à client/Logo-ThinXOS.png)Offizielles ThinX-OS-Logo (client/Logo-ThinXOS.png)Logotipo oficial (client/Logo-ThinXOS.png)Logótipo oficial (client/Logo-ThinXOS.png)Logo ufficiale (client/Logo-ThinXOS.png)לוגו רשמי (client/Logo-ThinXOS.png)licensemanager in chippcapp). Replace them if your build or language differs.
Captures ci-dessous : interface réelle de l’assistant ThinX OS Setup (licensemanager). Remplacez-les si votre build ou langue diffère.
Screenshots: echte Oberfläche von ThinX OS Setup (licensemanager).
Capturas: interfaz real del asistente ThinX OS Setup.
Capturas: interface real do assistente ThinX OS Setup.
Screenshot: interfaccia reale di ThinX OS Setup.
צילומי מסך תואמים לממשק האמיתי של ThinX OS Setup.
XXXX-XXXX-XXXX, Register this PCLokal — Lizenzserver, Code, RegistrierungLocal — código y registroLocal — código e registoLocale — codice e registrazioneמצב מקומי — רישום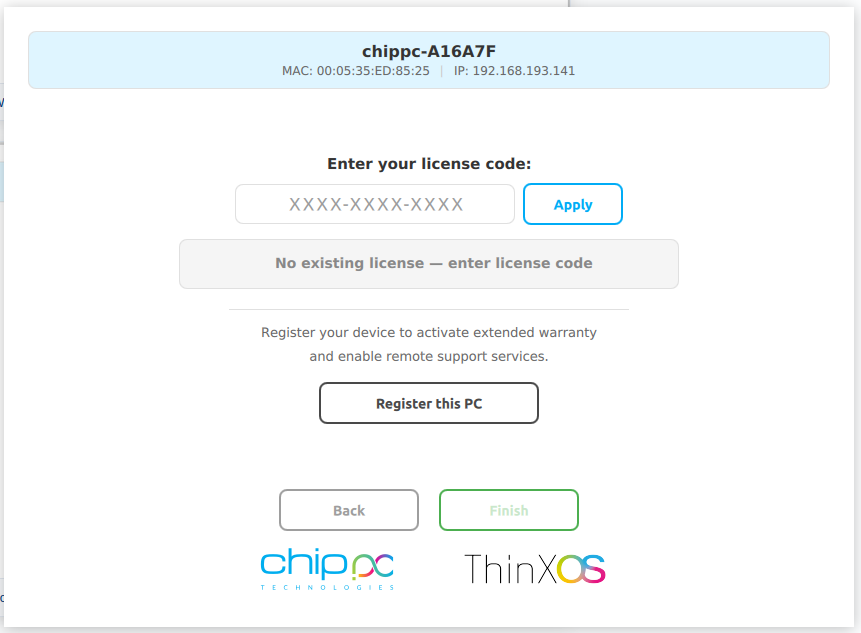
XXXX-XXXX-XXXX) and click Apply, or click Register this PC to activate extended warranty and remote supportLicence locale — saisir le code (XXXX-XXXX-XXXX) et cliquer Apply, ou Register this PC pour garantie et supportLokale Lizenz — Lizenzcode (XXXX-XXXX-XXXX) eingeben und Apply klicken, oder Register this PC für Garantie und SupportLicencia local — introducir código (XXXX-XXXX-XXXX) y pulsar Apply, o Register this PC para garantía y soporteLicença local — introduzir código (XXXX-XXXX-XXXX) e clicar Apply, ou Register this PC para garantia e suporteLicenza locale — inserire il codice (XXXX-XXXX-XXXX) e fare clic su Apply, o Register this PC per garanzia e supportoרישיון מקומי — הזן קוד רישיון (XXXX-XXXX-XXXX) ולחץ Apply, או לחץ Register this PC להפעלת אחריות ותמיכה מרחוקSystem Information Informations Système Systeminformationen Información del Sistema Informações do Sistema Informazioni di sistema מידע מערכת
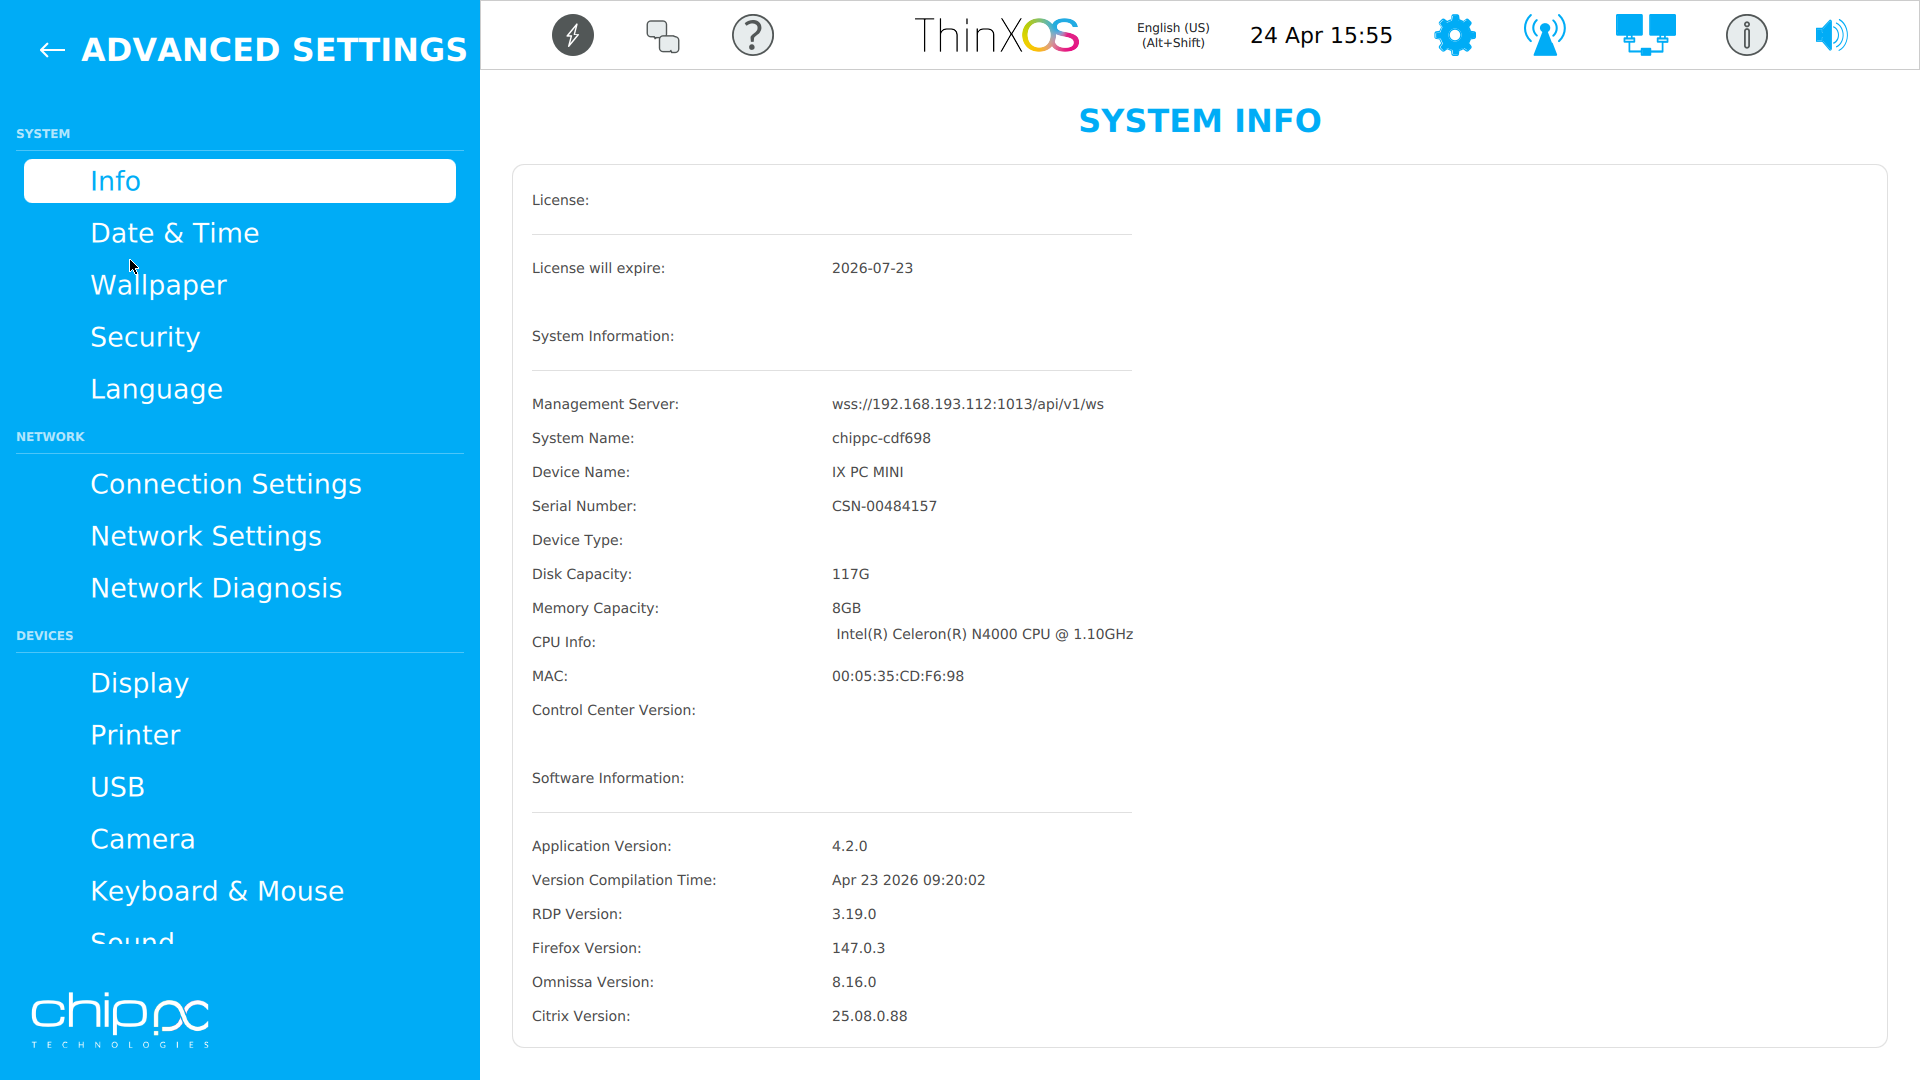
The System Information panel provides a complete real-time view of the thin client hardware and software state. It is read-only and intended for diagnostics, inventory, and support requests.
| Field | Description |
|---|---|
| Device Name | Hostname assigned to the thin client |
| OS Version | ThinX OS build number and kernel version |
| Hardware Model | ChipPC product model and hardware revision |
| CPU | Processor model and current load |
| RAM | Total and available memory (MB) |
| Storage | Flash storage size and free space |
| MAC Address | Ethernet MAC (used for WoL and inventory) |
| IP Address | Current IPv4 address and subnet |
| Serial Number | Factory serial number (used for licensing) |
Le panneau Informations Système offre une vue complète en temps réel de l'état matériel et logiciel du terminal léger. Lecture seule, destiné aux diagnostics et au support.
| Champ | Description |
|---|---|
| Nom de l'appareil | Nom d'hôte attribué au terminal |
| Version OS | Numéro de build ThinX OS et version du noyau |
| Modèle | Modèle de produit ChipPC et révision matérielle |
| CPU | Modèle du processeur et charge actuelle |
| RAM | Mémoire totale et disponible (Mo) |
| Stockage | Taille du stockage flash et espace libre |
| Adresse MAC | MAC Ethernet (utilisée pour WoL et inventaire) |
| Adresse IP | Adresse IPv4 et sous-réseau actuels |
| Numéro de série | Numéro de série usine (utilisé pour les licences) |
לוח מידע מערכת מספק תצוגה מלאה בזמן אמת של מצב החומרה והתוכנה של הטרמינל.
Display Settings Paramètres d'affichage Anzeigeeinstellungen Configuración de pantalla Configurações de ecrã Impostazioni display הגדרות תצוגה
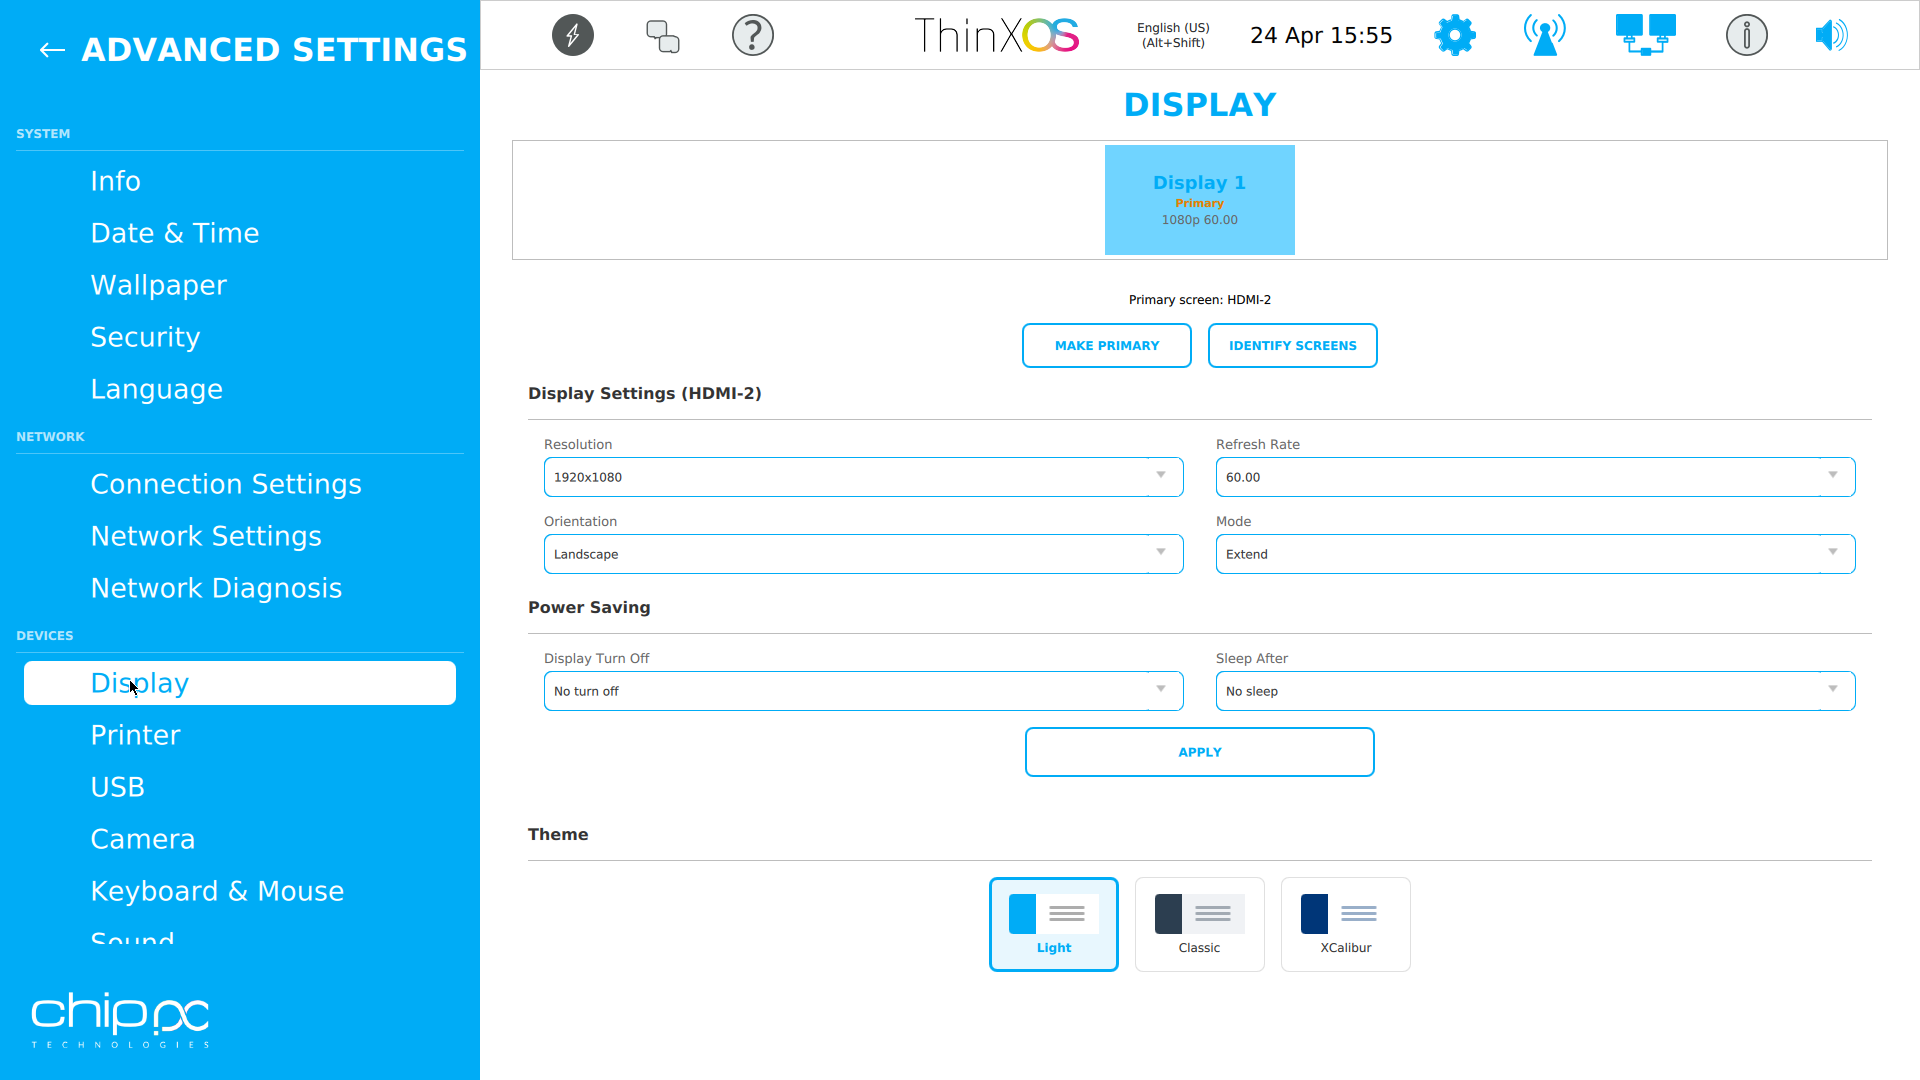
The Display panel controls all monitor and output settings. ThinX OS supports up to 2 simultaneous displays on compatible ChipPC hardware.
| Setting | Options / Notes |
|---|---|
| Resolution | Supports 1024×768 up to 3840×2160 (4K) depending on GPU |
| Refresh Rate | 60 Hz, 75 Hz, or auto-detect from EDID |
| Orientation | Landscape, Portrait, Inverted Landscape, Inverted Portrait |
| Display Mode | Single, Extend (dual-monitor), Mirror (clone) |
| Screen Sleep | DPMS timeout: 5 min, 30 min, 1h, 6h or Never |
| Turn Off | Screen power-off after: 1 min, 5 min, 30 min, 1h or Never |
| DPI Scaling | Auto, 96 dpi, 120 dpi, 144 dpi (for HiDPI monitors) |
Le panneau Affichage contrôle tous les paramètres de moniteur et de sortie. ThinX OS prend en charge jusqu'à 2 écrans simultanés sur le matériel ChipPC compatible.
| Paramètre | Options / Notes |
|---|---|
| Résolution | De 1024×768 à 3840×2160 (4K) selon le GPU |
| Taux de rafraîchissement | 60 Hz, 75 Hz ou détection automatique EDID |
| Orientation | Paysage, Portrait, Paysage inversé, Portrait inversé |
| Mode d'affichage | Simple, Extension (double écran), Miroir (clone) |
| Mise en veille écran | DPMS : 5 min, 30 min, 1h, 6h ou Jamais |
| Extinction | Extinction de l'écran après : 1 min, 5 min, 30 min, 1h ou Jamais |
לוח תצוגה שולט בכל הגדרות המסך. ThinX OS תומך עד 2 מסכים בו-זמנית בחומרת ChipPC תואמת.
Network Settings Paramètres Réseau Netzwerkeinstellungen Configuración de red Configurações de rede Impostazioni di rete הגדרות רשת
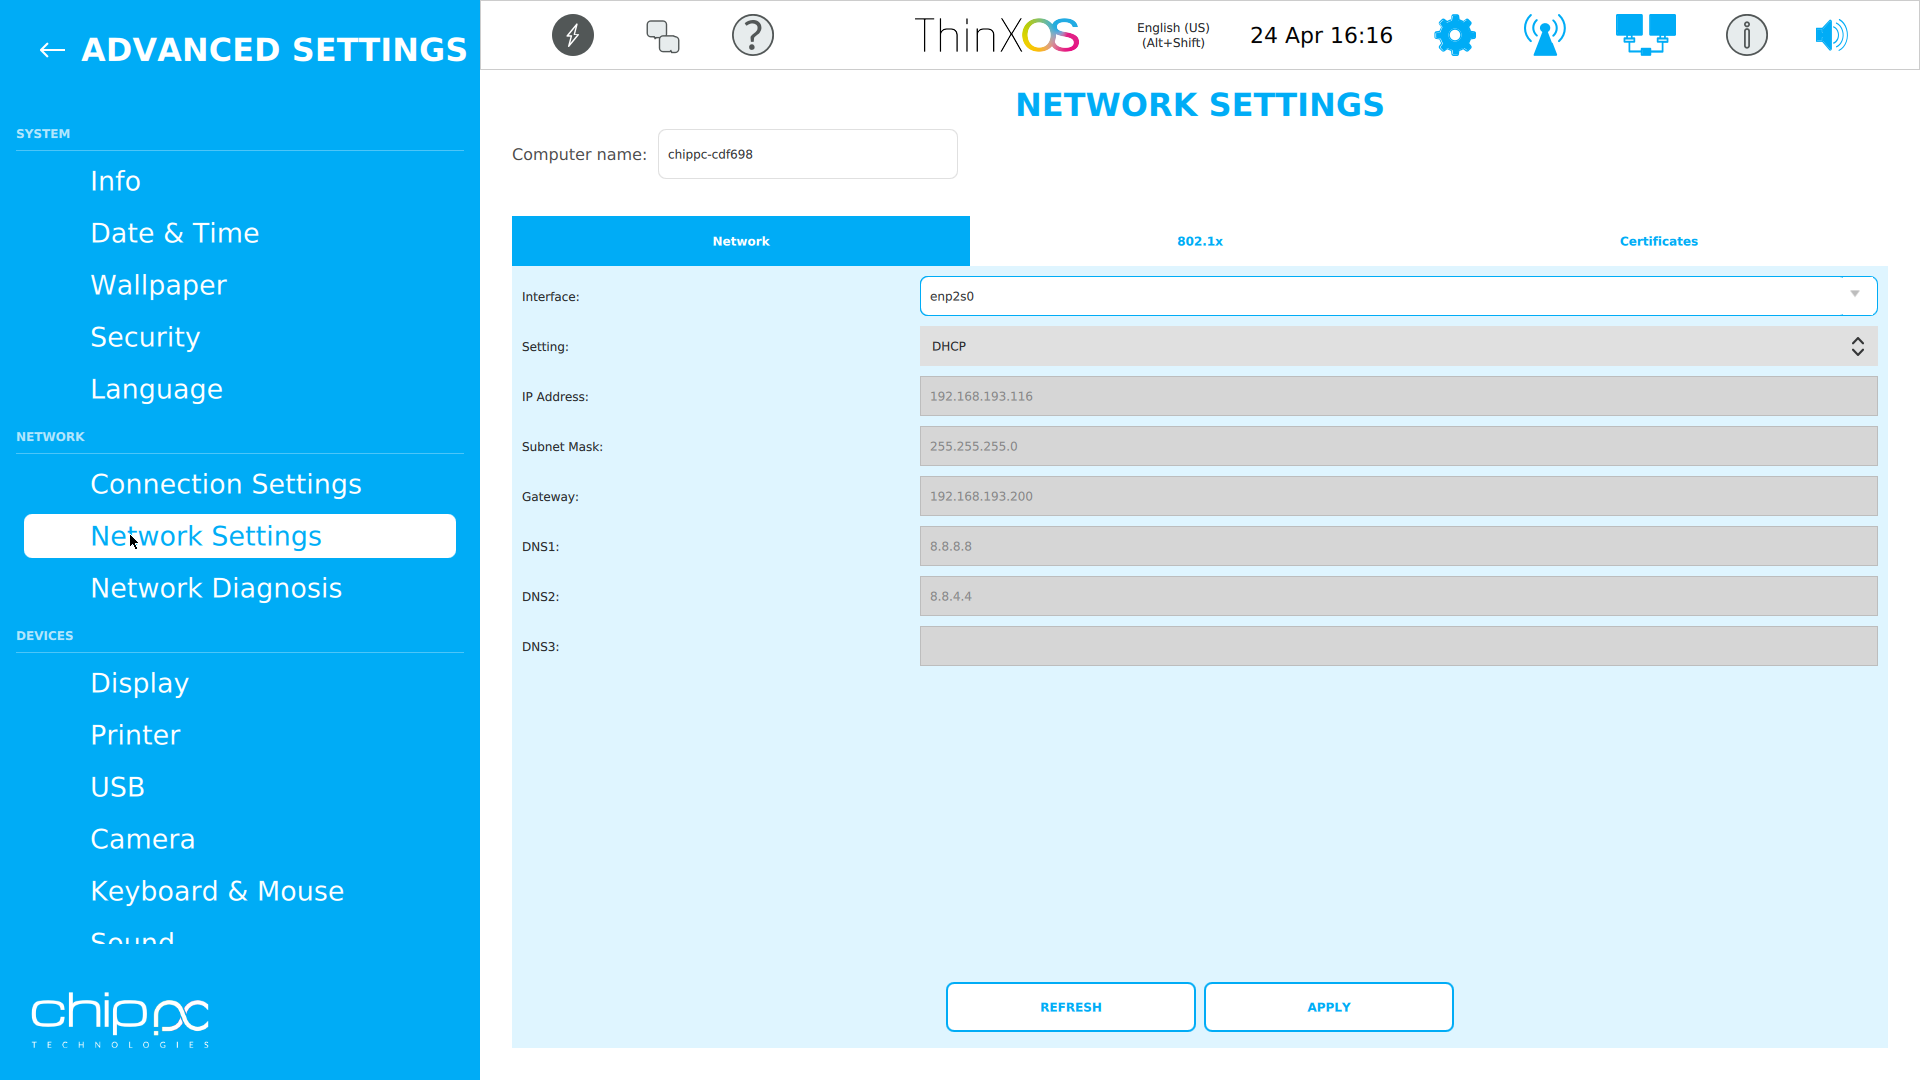
The Network panel configures all connectivity parameters. ThinX OS supports wired Ethernet, Wi-Fi (on equipped models), and 802.1X enterprise authentication.
| Setting | Description |
|---|---|
| DHCP / Static IP | Choose automatic IP via DHCP or manually set IP, mask, gateway, DNS |
| IPv6 | Enable/disable IPv6 (dual-stack supported) |
| Wi-Fi | SSID, WPA2/WPA3-Personal or Enterprise, hidden networks |
| 802.1X | PEAP-MSCHAPv2, EAP-TLS with certificate, EAP-TTLS |
| Proxy | HTTP/HTTPS proxy, PAC file URL, bypass list |
| DNS | Primary and secondary DNS servers |
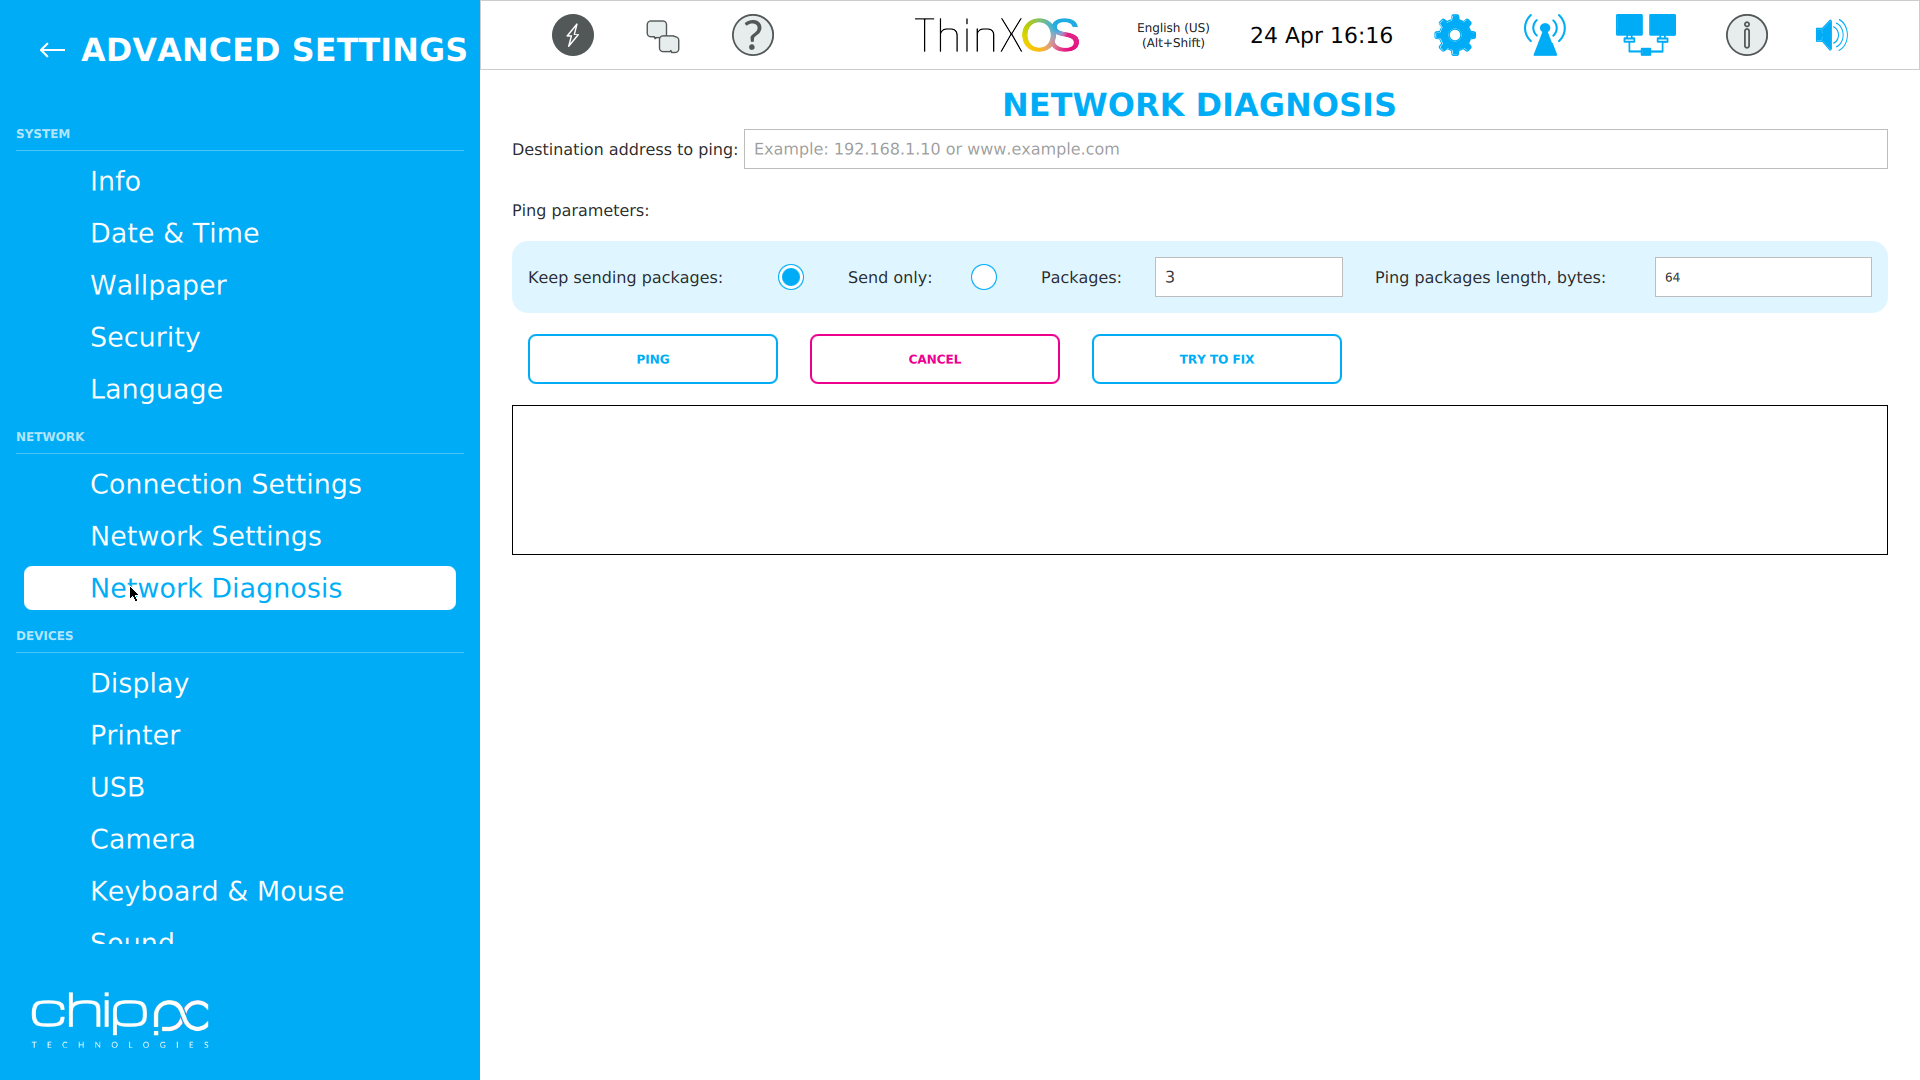
| Network Diagnostics | Built-in ping, traceroute, and connectivity check tools |
Le panneau Réseau configure tous les paramètres de connectivité. ThinX OS supporte Ethernet filaire, Wi-Fi et l'authentification d'entreprise 802.1X.
| Paramètre | Description |
|---|---|
| DHCP / IP statique | IP automatique ou configuration manuelle IP, masque, passerelle, DNS |
| IPv6 | Activer/désactiver IPv6 (dual-stack supporté) |
| Wi-Fi | SSID, WPA2/WPA3-Personnel ou Entreprise, réseaux cachés |
| 802.1X | PEAP-MSCHAPv2, EAP-TLS avec certificat, EAP-TTLS |
| Proxy | Proxy HTTP/HTTPS, URL de fichier PAC, liste de contournement |
| DNS | Serveurs DNS primaire et secondaire |
לוח רשת מגדיר את כל פרמטרי הקישוריות. ThinX OS תומך ב-Ethernet קווי, Wi-Fi ואימות ארגוני 802.1X.
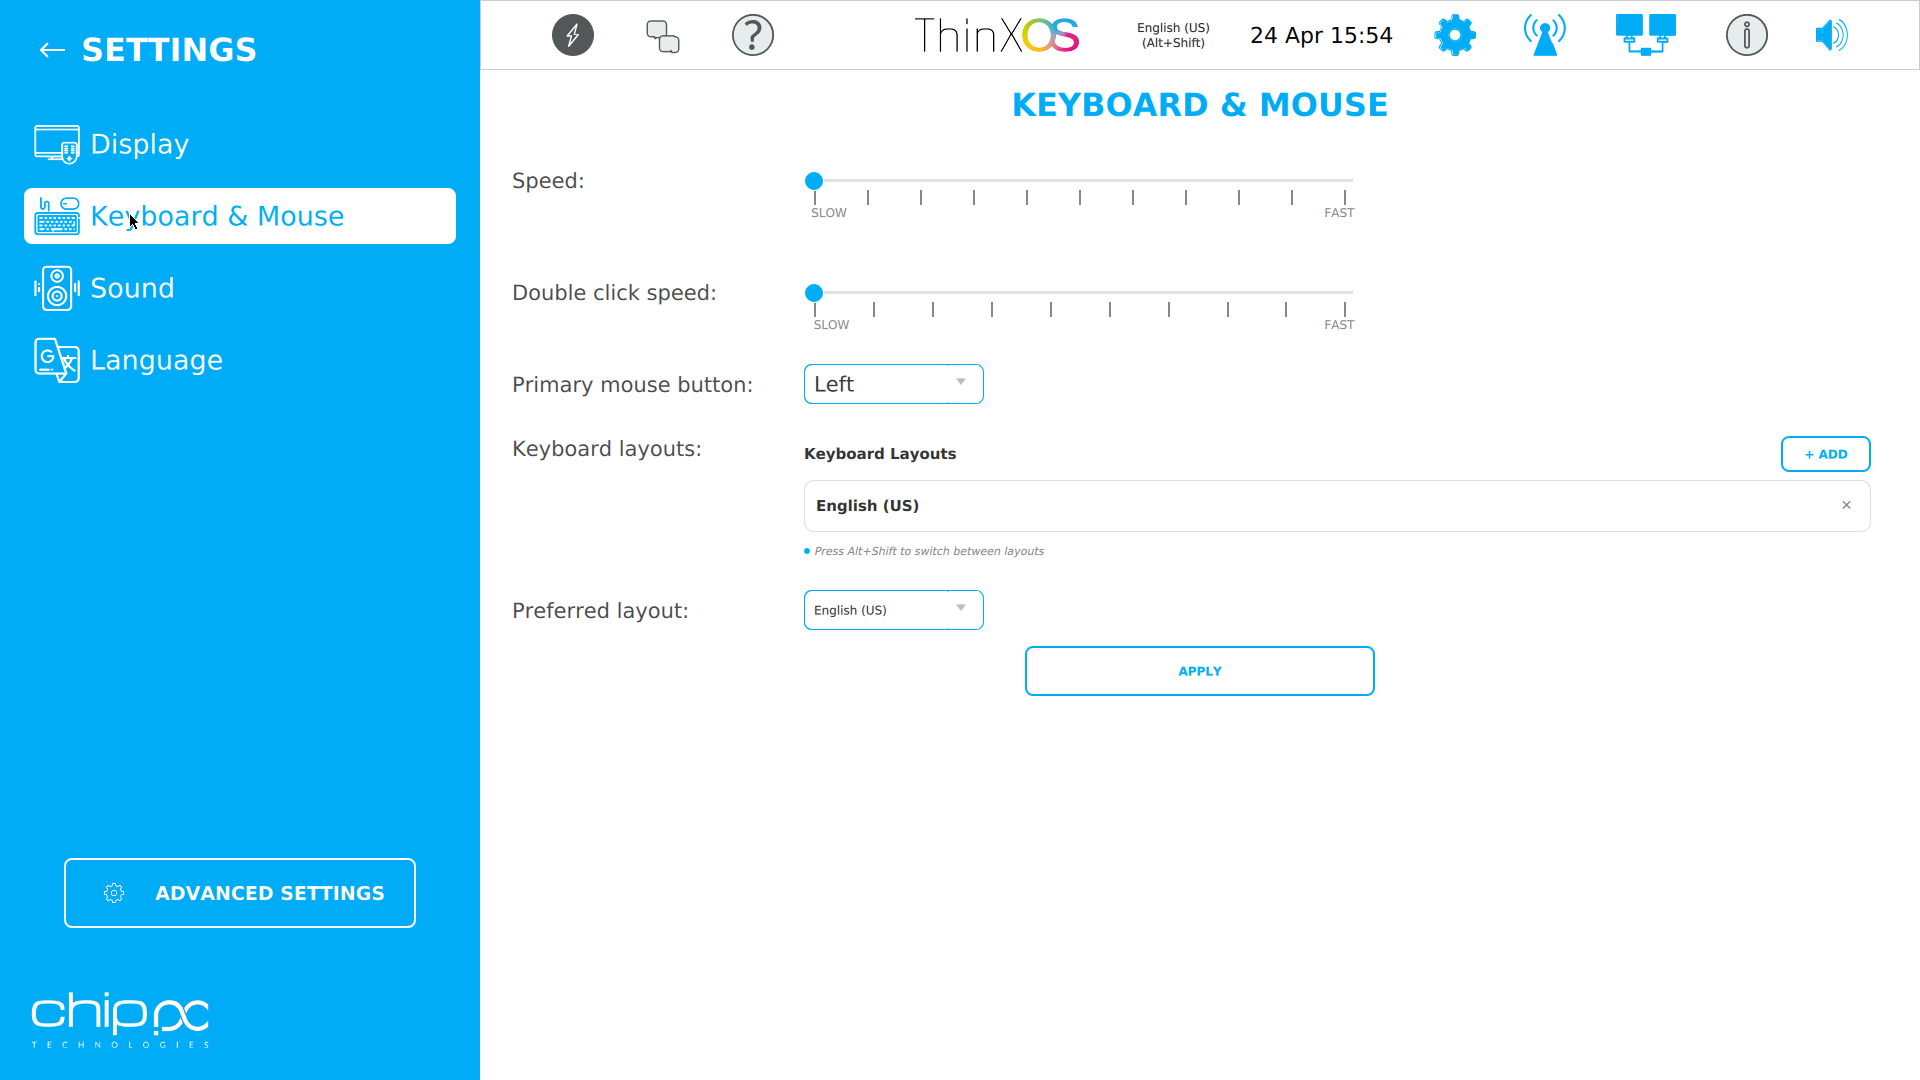
Keyboard & Mouse Clavier & Souris Tastatur & Maus Teclado & Ratón Teclado & Rato Tastiera & Mouse מקלדת ועכבר
The Keyboard & Mouse panel manages input device settings. Layouts can be stacked (multi-layout), allowing users to switch between languages using a keyboard shortcut.
| Setting | Details |
|---|---|
| Keyboard Layout | US (QWERTY), UK, FR (AZERTY), DE (QWERTZ), ES, IT, PT, RU, HE, AR, and many more |
| Multi-Layout | Stack up to 4 layouts; switch with Alt+Shift or Super+Space |
| Mouse Speed | Slow / Medium / Fast (acceleration curve) |
| Double-Click Speed | Slow / Medium / Fast |
| Primary Button | Left or Right (for left-handed users) |
| Scroll Direction | Natural (trackpad-style) or Traditional |
Le panneau Clavier & Souris gère les paramètres des périphériques d'entrée. Les dispositions peuvent être empilées (multi-disposition) pour basculer entre les langues avec un raccourci clavier.
| Paramètre | Détails |
|---|---|
| Disposition clavier | US (QWERTY), UK, FR (AZERTY), DE (QWERTZ), ES, IT, PT, RU, HE, AR et autres |
| Multi-disposition | Jusqu'à 4 dispositions ; basculer avec Alt+Shift |
| Vitesse souris | Lente / Moyenne / Rapide |
| Vitesse double-clic | Lente / Moyenne / Rapide |
| Bouton principal | Gauche ou Droite (pour gauchers) |
לוח מקלדת ועכבר מנהל הגדרות התקני קלט. ניתן לערום פריסות (רב-פריסה) ולעבור ביניהן עם קיצור מקלדת.
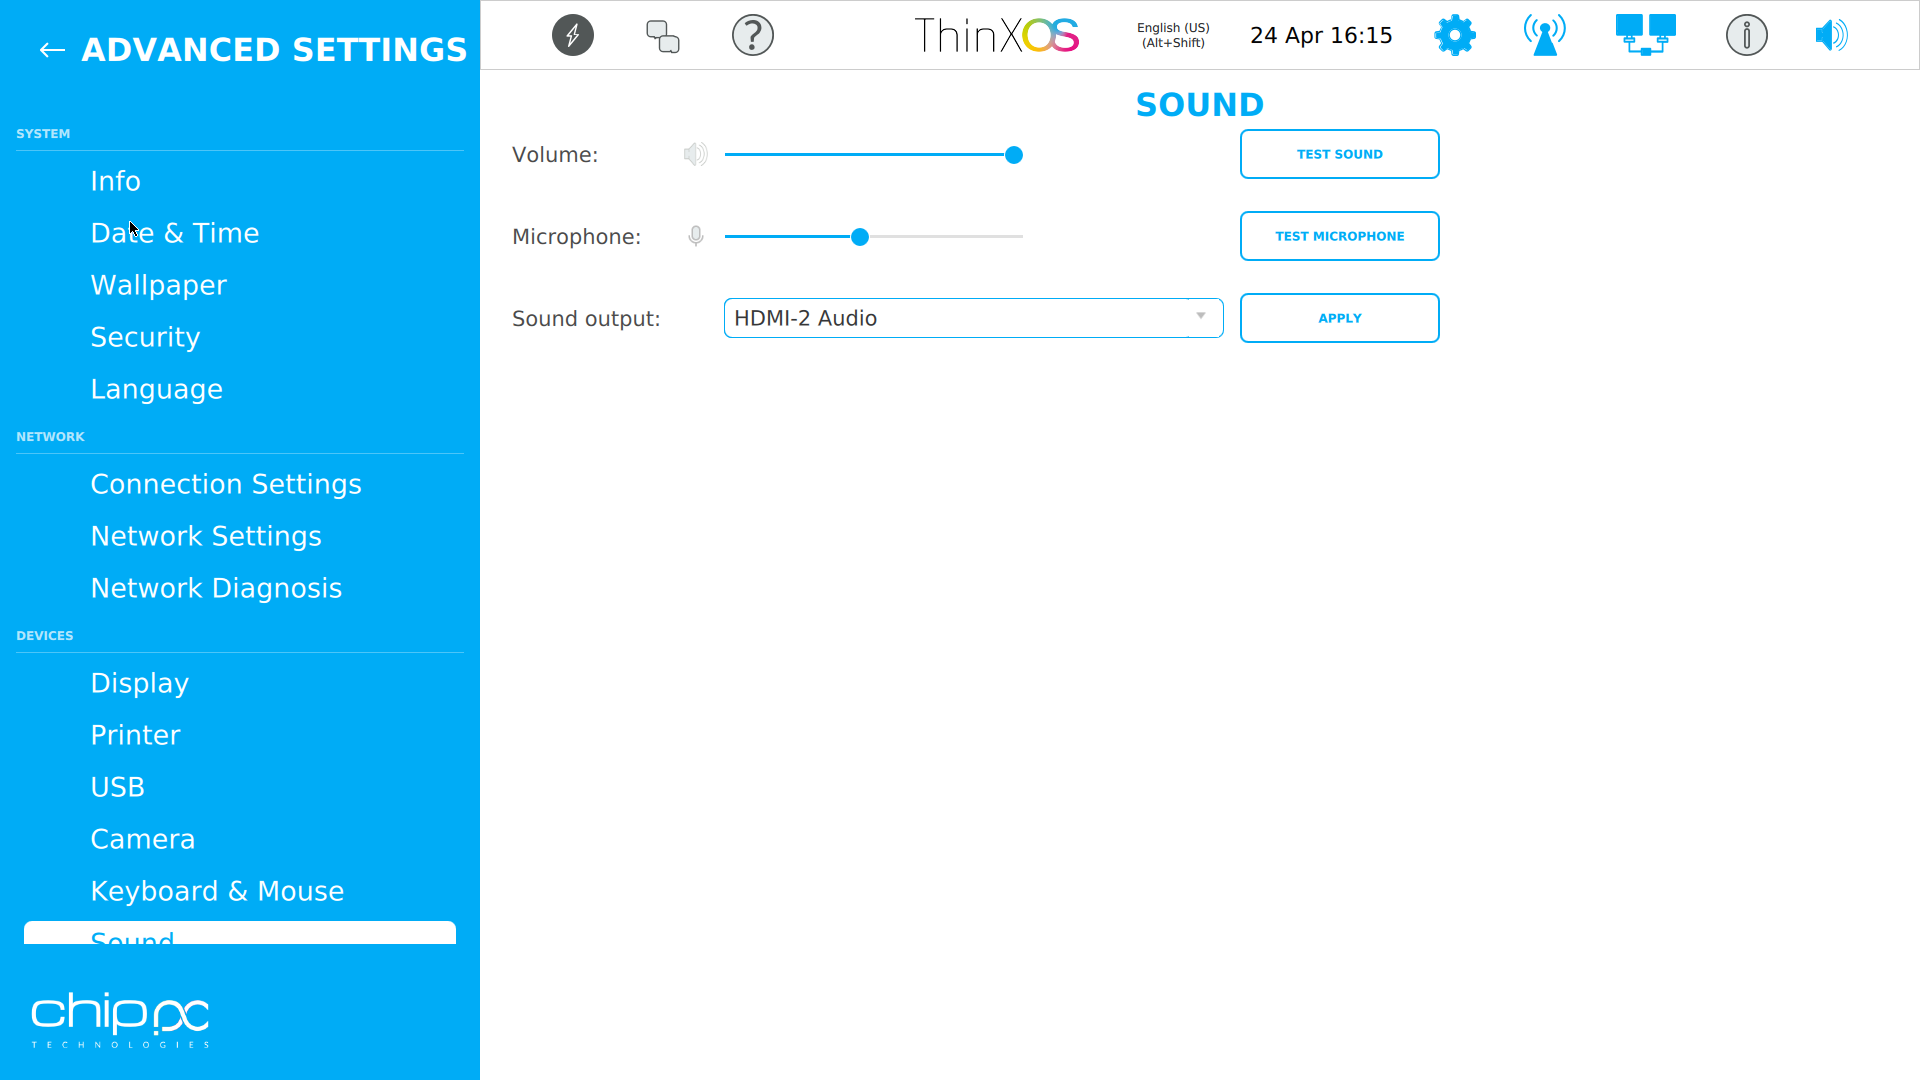
Sound Settings Paramètres Audio Toneinstellungen Configuración de sonido Configurações de som Impostazioni audio הגדרות שמע
The Sound panel controls audio output and microphone. ThinX OS uses PulseAudio to manage multiple audio sinks.
| Setting | Details |
|---|---|
| Sound Enable / Disable | Globally mute or enable all audio output |
| Output Volume | 0–100% with slider; can also be set by Xcalibur task |
| Microphone Volume | 0–100% for microphone input (used in remoting sessions) |
| Active Audio Output | Select sink: HDMI Audio, 3.5mm Analog, USB Speaker, Bluetooth |
| Audio Redirect | Audio redirection to/from remote session (RDP, Citrix, Horizon) |
Le panneau Audio contrôle la sortie audio et le microphone. ThinX OS utilise PulseAudio pour gérer plusieurs sorties audio.
| Paramètre | Détails |
|---|---|
| Activer / Désactiver | Couper ou activer globalement toutes les sorties audio |
| Volume de sortie | 0–100% avec curseur ; peut aussi être défini par une tâche Xcalibur |
| Volume microphone | 0–100% pour l'entrée microphone |
| Sortie audio active | Sélectionner : HDMI Audio, Analogique 3,5mm, Haut-parleur USB, Bluetooth |
לוח שמע שולט בפלט אודיו ומיקרופון. ThinX OS משתמש ב-PulseAudio לניהול מספר מוצאי שמע.
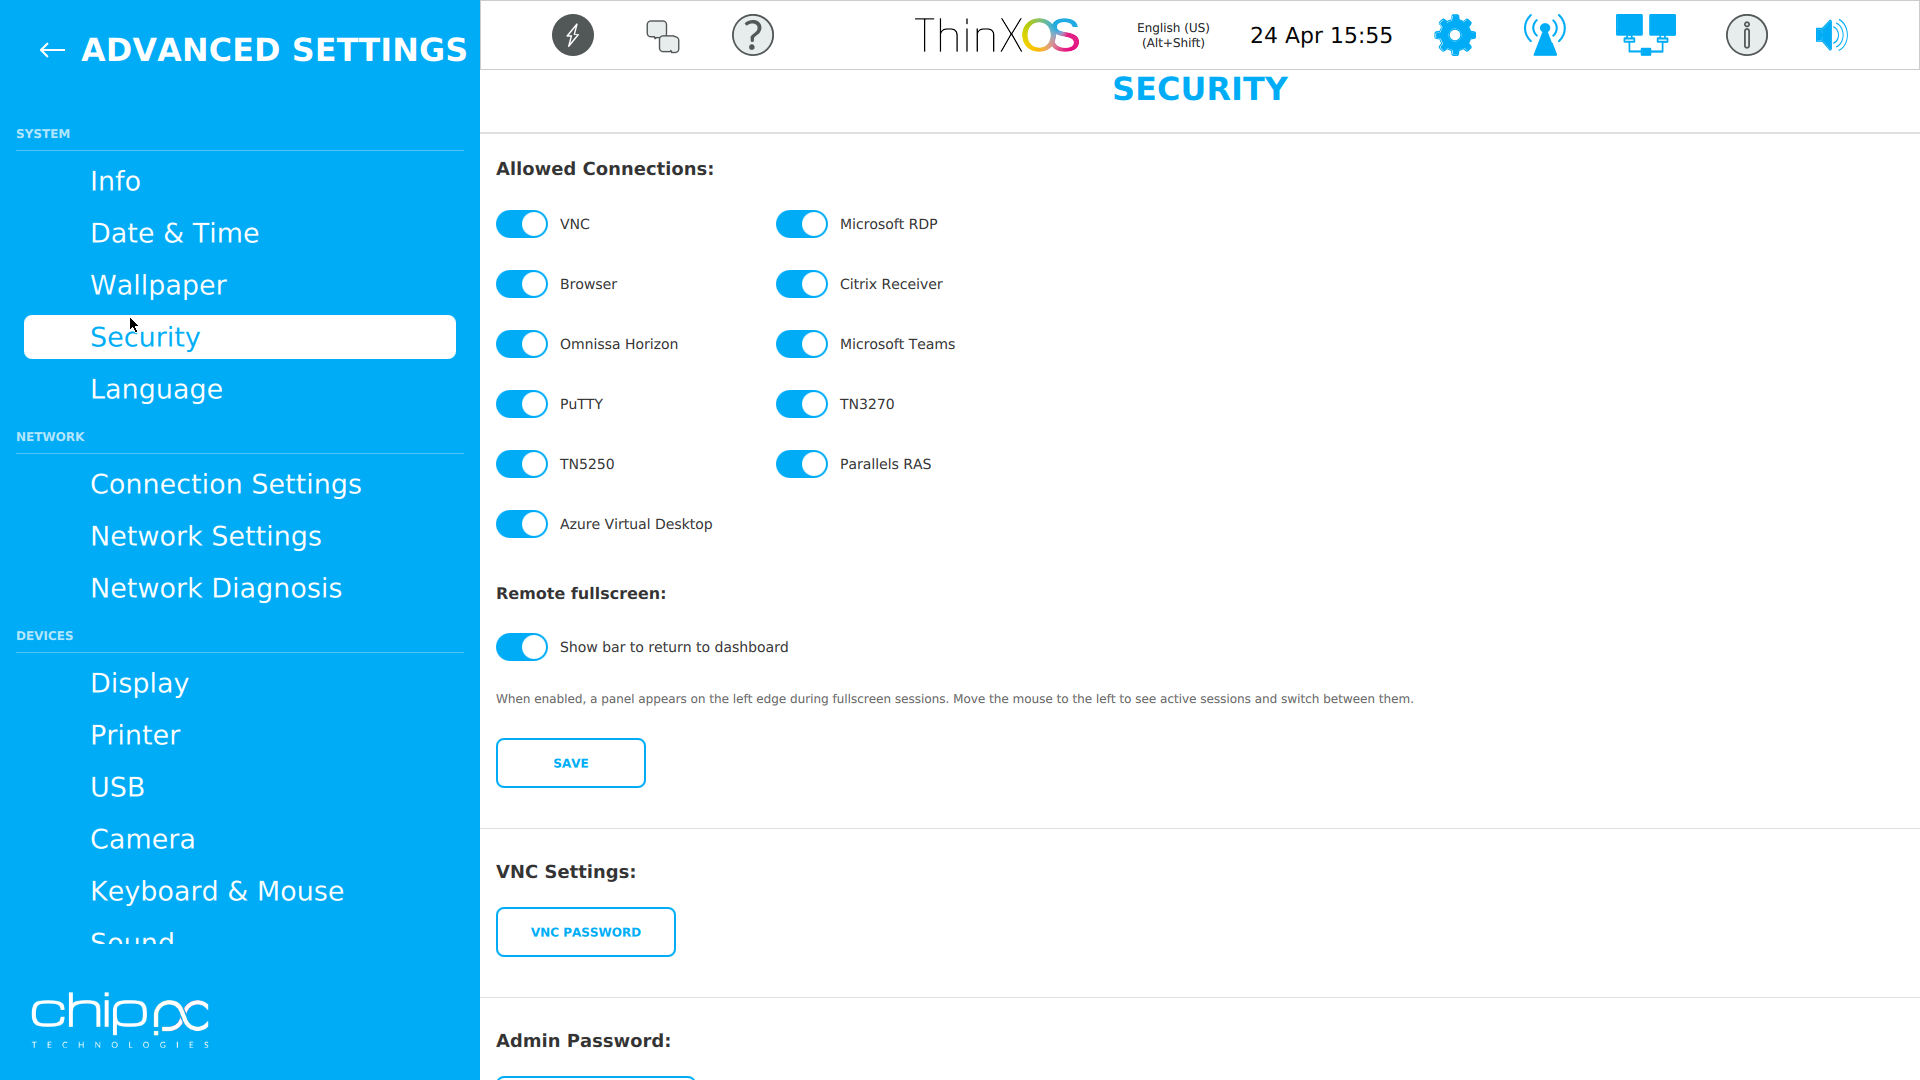
Security Sécurité Sicherheit Seguridad Segurança Sicurezza אבטחה
The Security panel controls access protection for ThinX OS. Local changes require an administrator password; all security policies are enforced remotely via Xcalibur.
| Setting | Description |
|---|---|
| Advanced Settings Password | Local admin password to access the ThinX OS settings panel |
| VNC Password | Password required to connect via VNC for remote control |
| Advanced Settings Lock | Enable/disable local access to the settings panel entirely (kiosk mode) |
| Certificates | Import CA certificates (PEM/DER) for HTTPS, 802.1X EAP-TLS, and VPN |
| Screen Lock | Configure lock-screen timeout and unlock method |
Le panneau Sécurité contrôle la protection des accès à ThinX OS. Les modifications locales nécessitent un mot de passe administrateur ; toutes les politiques de sécurité sont appliquées à distance via Xcalibur.
| Paramètre | Description |
|---|---|
| Mot de passe des paramètres avancés | Mot de passe admin local pour accéder au panneau de paramètres ThinX OS |
| Mot de passe VNC | Mot de passe requis pour se connecter via VNC |
| Verrouillage des paramètres | Activer/désactiver l'accès local au panneau de paramètres (mode kiosque) |
| Certificats | Importer des certificats CA (PEM/DER) pour HTTPS, 802.1X EAP-TLS et VPN |
לוח אבטחה שולט בהגנת הגישה ל-ThinX OS. שינויים מקומיים דורשים סיסמת מנהל.
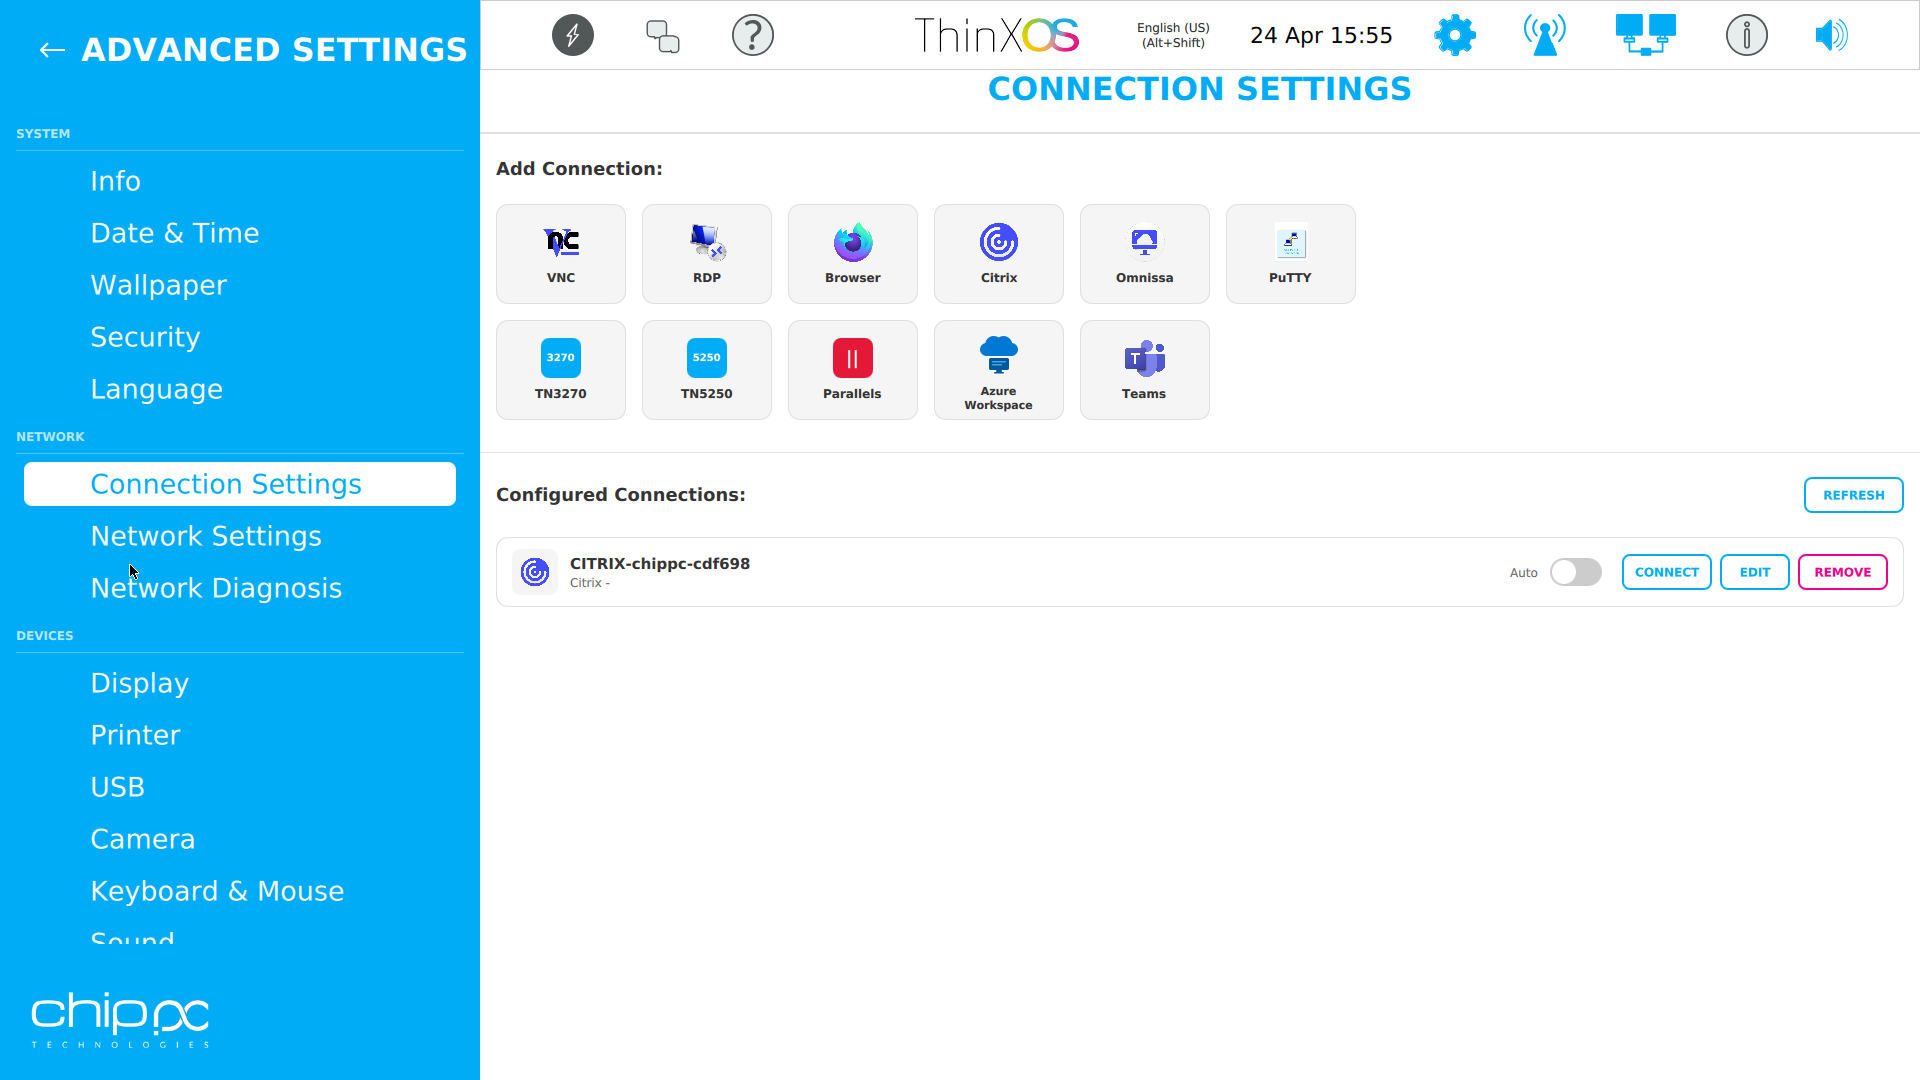
Connections Connexions Verbindungen Conexiones Conexões Connessioni חיבורים
The Connections panel lists all remote session connections configured on the thin client. Connections are typically deployed from Xcalibur and appear here for review and local launch.
| Protocol | Features |
|---|---|
| RDP (Microsoft) | Full RDP 8.1/10 support: NLA, RemoteFX, multi-monitor, USB/audio redirect |
| Citrix ICA / HDX | Citrix Workspace App: HDX, H.264, USB passthrough, Citrix Gateway |
| VMware Horizon | Omnissa Horizon Client: Blast Extreme, PCoIP, USB redirect, RTAV |
| VNC | VNC Viewer for screen sharing and remote assistance |
| SSH | Terminal SSH for administration access |
| Web Browser | Built-in Chromium for web application access |
Each connection can be configured with auto-connect on boot, connection priority, and fallback behavior.
Le panneau Connexions liste toutes les connexions de session distante configurées sur le terminal. Les connexions sont généralement déployées depuis Xcalibur.
| Protocole | Fonctionnalités |
|---|---|
| RDP (Microsoft) | Support complet RDP 8.1/10 : NLA, RemoteFX, multi-écrans, redirection USB/audio |
| Citrix ICA / HDX | Citrix Workspace App : HDX, H.264, USB passthrough, Citrix Gateway |
| VMware Horizon | Client Omnissa Horizon : Blast Extreme, PCoIP, redirection USB |
| VNC | Visualiseur VNC pour partage d'écran et assistance à distance |
| SSH | Terminal SSH pour accès d'administration |
| Navigateur Web | Chromium intégré pour les applications web |
לוח חיבורים מפרט את כל חיבורי הסשן המרחוק המוגדרים על הטרמינל.
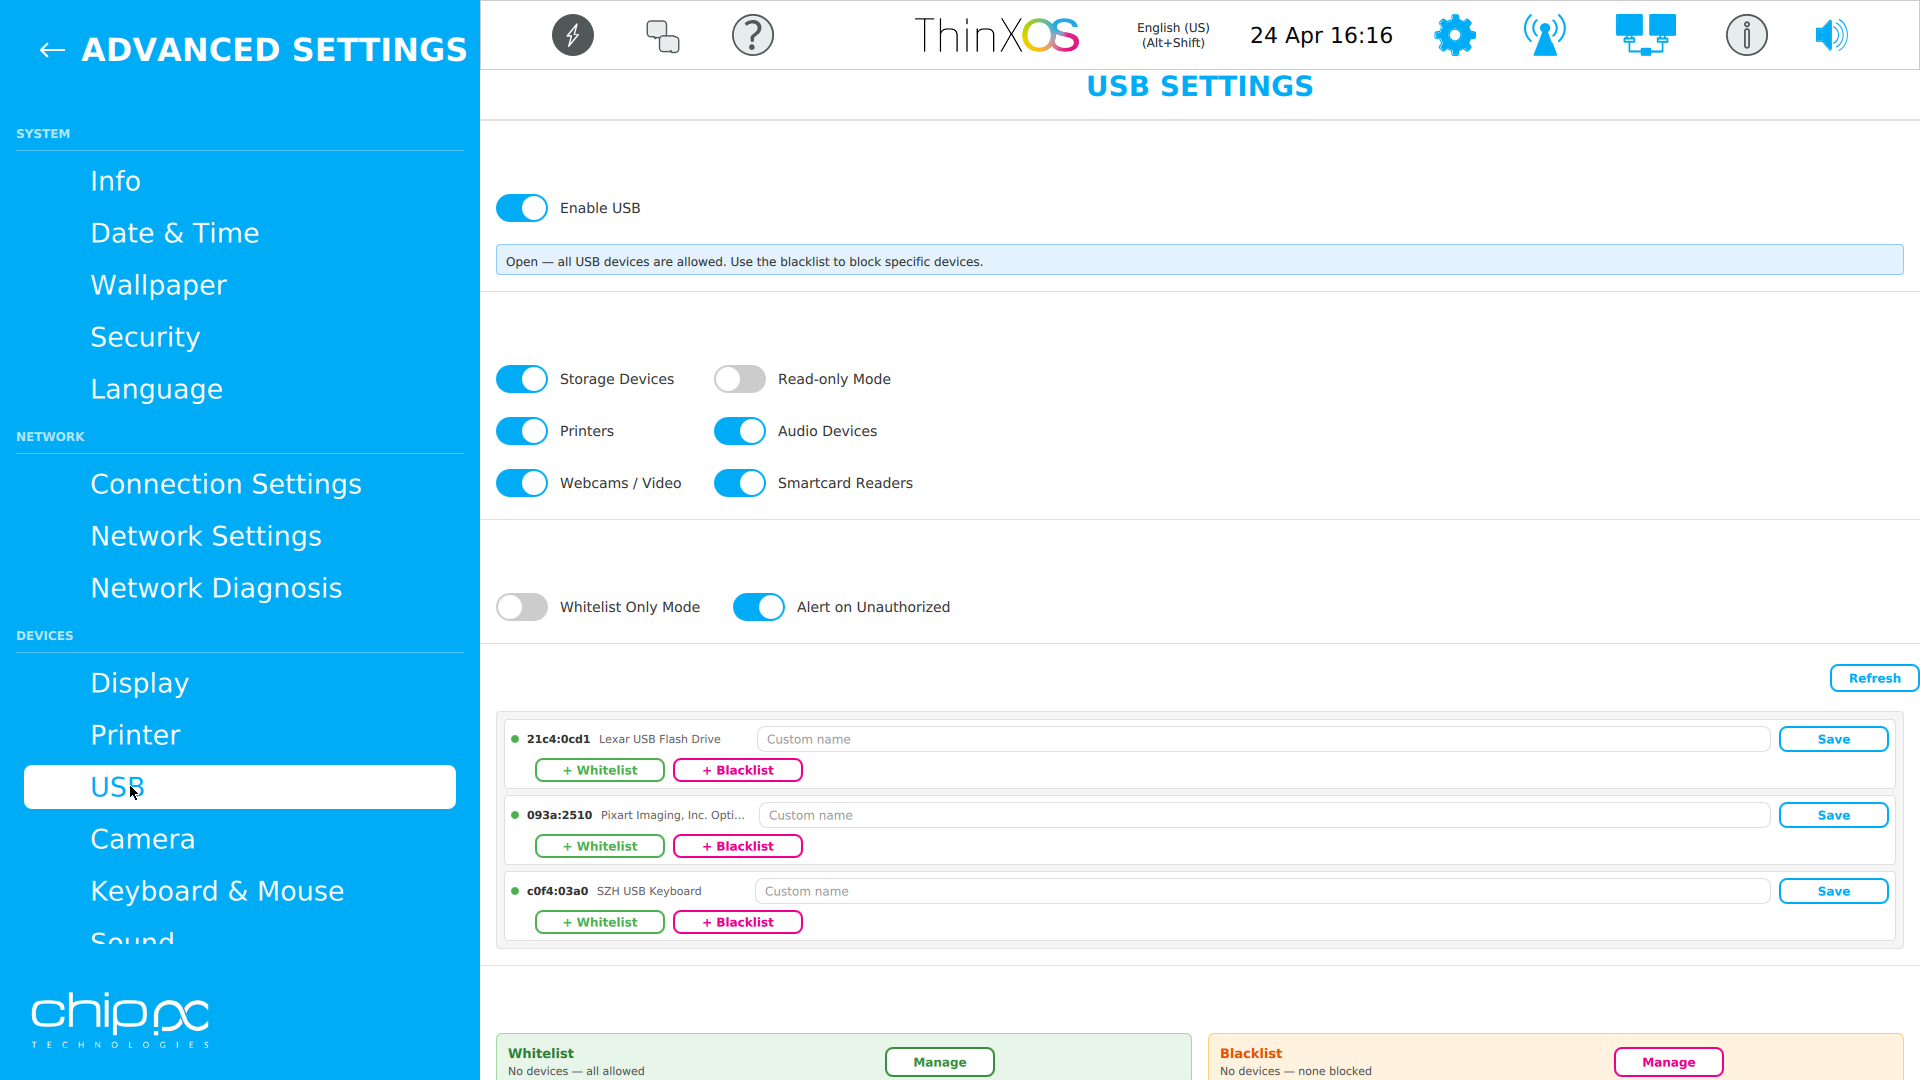
USB Settings Paramètres USB USB-Einstellungen Configuración USB Configurações USB Impostazioni USB הגדרות USB
The USB panel provides granular control over which USB device classes are permitted on the thin client. This is critical for endpoint security and compliance.
| Device Class | Control |
|---|---|
| Storage Devices | Enable/disable USB flash drives and external hard disks |
| Storage Read-Only | Allow mounting storage in read-only mode (prevents data leaks) |
| Printers | Enable/disable USB printer connections |
| Audio Devices | Enable/disable USB headsets and speakers |
| Webcams / Video | Enable/disable USB cameras for video conferencing |
| Smartcard Readers | Enable/disable smart card and FIDO2 security key readers |
| Alert on Unauthorized | Send an alert to Xcalibur when a blocked device is connected |
| Whitelist / Blacklist | Apply Vendor ID / Product ID policies from Xcalibur USB Policy library |
Le panneau USB offre un contrôle granulaire sur les classes de périphériques USB autorisées sur le terminal.
| Classe de périphérique | Contrôle |
|---|---|
| Stockage | Activer/désactiver les clés USB et disques durs externes |
| Stockage lecture seule | Monter le stockage en lecture seule (prévient les fuites de données) |
| Imprimantes | Activer/désactiver les connexions d'imprimantes USB |
| Périphériques audio | Activer/désactiver les casques et haut-parleurs USB |
| Webcams / Vidéo | Activer/désactiver les caméras USB pour la visioconférence |
| Lecteurs de carte | Activer/désactiver les lecteurs de cartes à puce et FIDO2 |
| Alerte non autorisé | Envoyer une alerte à Xcalibur quand un périphérique bloqué est connecté |
לוח USB מספק שליטה גרנולרית על אילו מחלקות USB מותרות על הטרמינל.
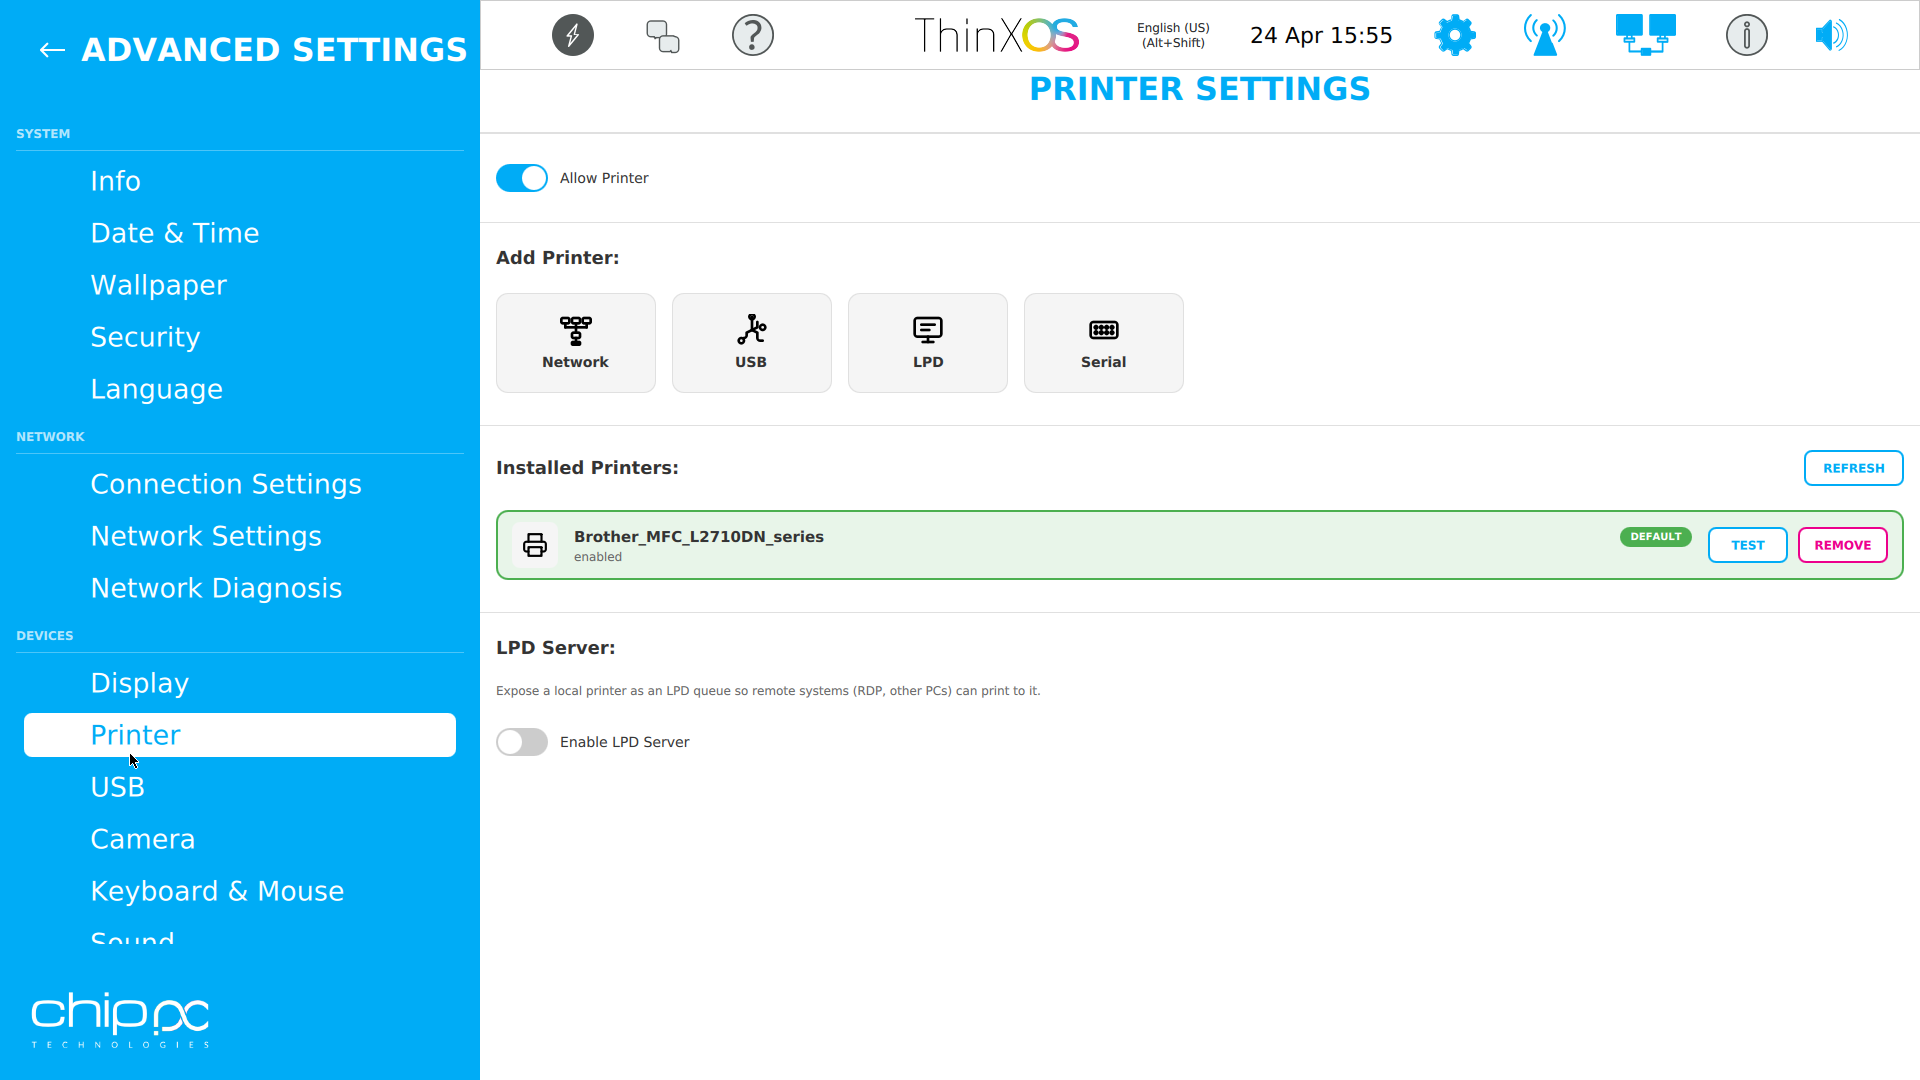
Printers Imprimantes Drucker Impresoras Impressoras Stampanti מדפסות
The Printers panel lists all locally configured printers and allows enabling the LPD (Line Printer Daemon) server for network printing. Printers can be deployed centrally from Xcalibur.
| Feature | Details |
|---|---|
| Network Printers | Add printers by IP using LPR/IPP/CUPS protocols |
| USB Printers | Auto-detected when USB printer class is enabled |
| LPD Server | Enable ThinX OS as an LPD print server with configurable queue name |
| Default Printer | Select the default CUPS printer for all local print jobs |
| Enable / Disable Printing | Globally enable or disable printing capability |
| Driver | CUPS-compatible drivers or generic PCL/PostScript |
Le panneau Imprimantes liste toutes les imprimantes configurées localement et permet d'activer le serveur LPD pour l'impression réseau.
לוח מדפסות מפרט את כל המדפסות המוגדרות מקומית ומאפשר הפעלת שרת LPD להדפסה ברשת.
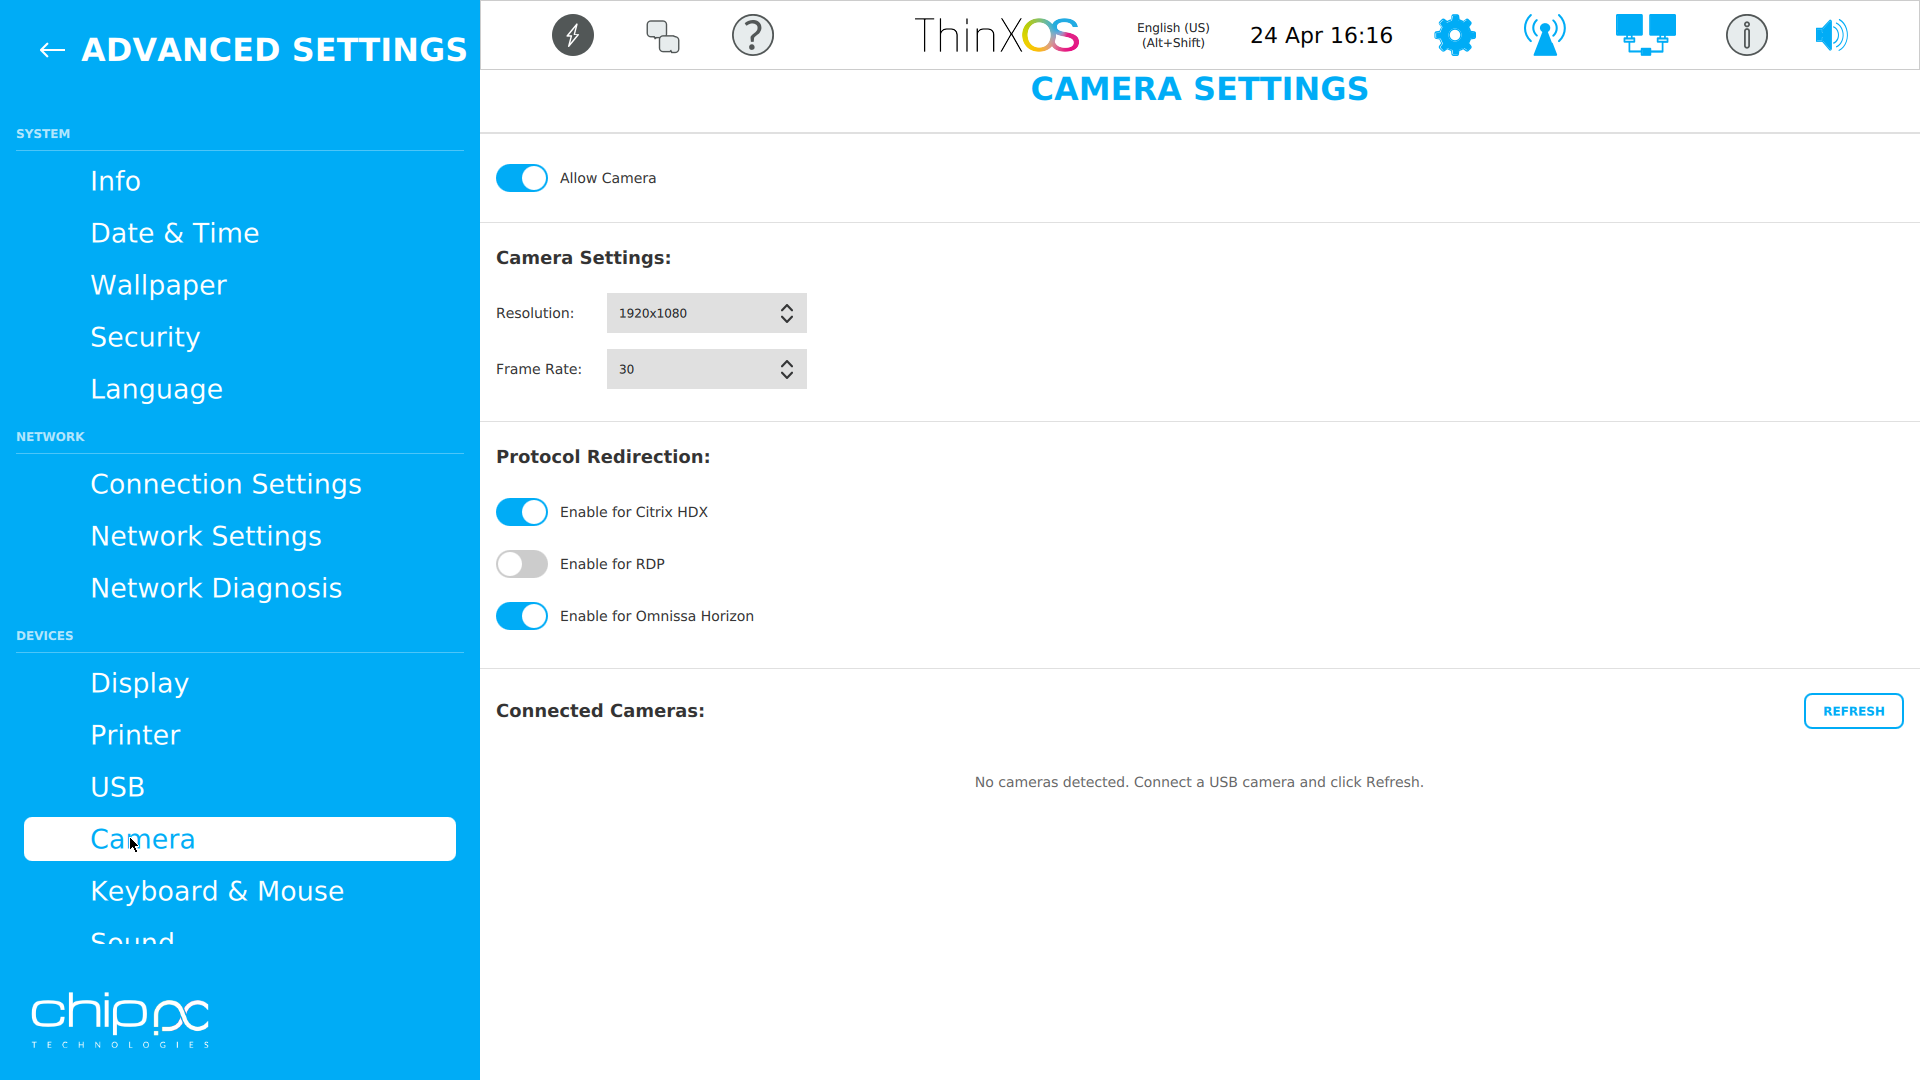
Camera Settings Paramètres Caméra Kameraeinstellungen Configuración de cámara Configurações da câmara Impostazioni fotocamera הגדרות מצלמה
The Camera panel configures webcam / video capture settings, including compatibility settings for different remoting protocols.
| Setting | Details |
|---|---|
| Camera Enable / Disable | Globally enable or disable the camera device |
| Resolution | Select capture resolution: 480p, 720p, 1080p |
| Frame Rate | Select frame rate: 15fps, 30fps, 60fps |
| Default Device | Select which camera to use when multiple are connected |
| Citrix HDX RealTime | Enable optimized camera redirect via Citrix HDX protocol |
| Citrix H.264 | Enable H.264 hardware encoding for Citrix sessions |
| RDP Redirect | Enable camera redirection in Microsoft RDP sessions |
| Omnissa RTAV | Enable Real-Time Audio-Video for VMware Horizon sessions |
Le panneau Caméra configure les paramètres de webcam / capture vidéo, y compris les paramètres de compatibilité pour les différents protocoles de remoting.
לוח מצלמה מגדיר הגדרות מצלמת רשת / לכידת וידאו.
Date & Time Date & Heure Datum & Uhrzeit Fecha & Hora Data & Hora Data & Ora תאריך ושעה
The Date & Time panel configures system clock, timezone, and NTP synchronization. Accurate time is critical for Kerberos authentication (Active Directory) and SSL certificate validation.
| Setting | Details |
|---|---|
| Time Zone | Select from full IANA timezone database (e.g., Europe/Paris, America/New_York) |
| Auto Adjust DST | Automatically apply Daylight Saving Time changes |
| NTP Server | Specify NTP server address (e.g., time.nist.gov, pool.ntp.org, or internal server) |
| Time Format | 12-hour (AM/PM) or 24-hour clock display |
| Manual Date/Time | Set date and time manually when NTP is not available |
Le panneau Date & Heure configure l'horloge système, le fuseau horaire et la synchronisation NTP. L'heure précise est essentielle pour l'authentification Kerberos (Active Directory) et la validation des certificats SSL.
לוח תאריך ושעה מגדיר שעון המערכת, אזור זמן וסינכרון NTP.

System Language Langue du Système Systemsprache Idioma del Sistema Idioma do Sistema Lingua di sistema שפת מערכת
The Language panel sets the UI locale of ThinX OS — the language used in menus, error messages, and system dialogs.
| Setting | Details |
|---|---|
| System Language | English, French, German, Spanish, Portuguese, Italian, Hebrew, Arabic, Russian, Japanese, Chinese, and more |
| Regional Format | Date format, number format, and currency symbol based on locale |
| Keyboard Locale | Optionally linked to system language for automatic layout selection |
Le panneau Langue définit la locale de l'interface utilisateur de ThinX OS — la langue utilisée dans les menus, messages d'erreur et dialogues système.
לוח שפה מגדיר את ה-locale של ממשק המשתמש של ThinX OS.

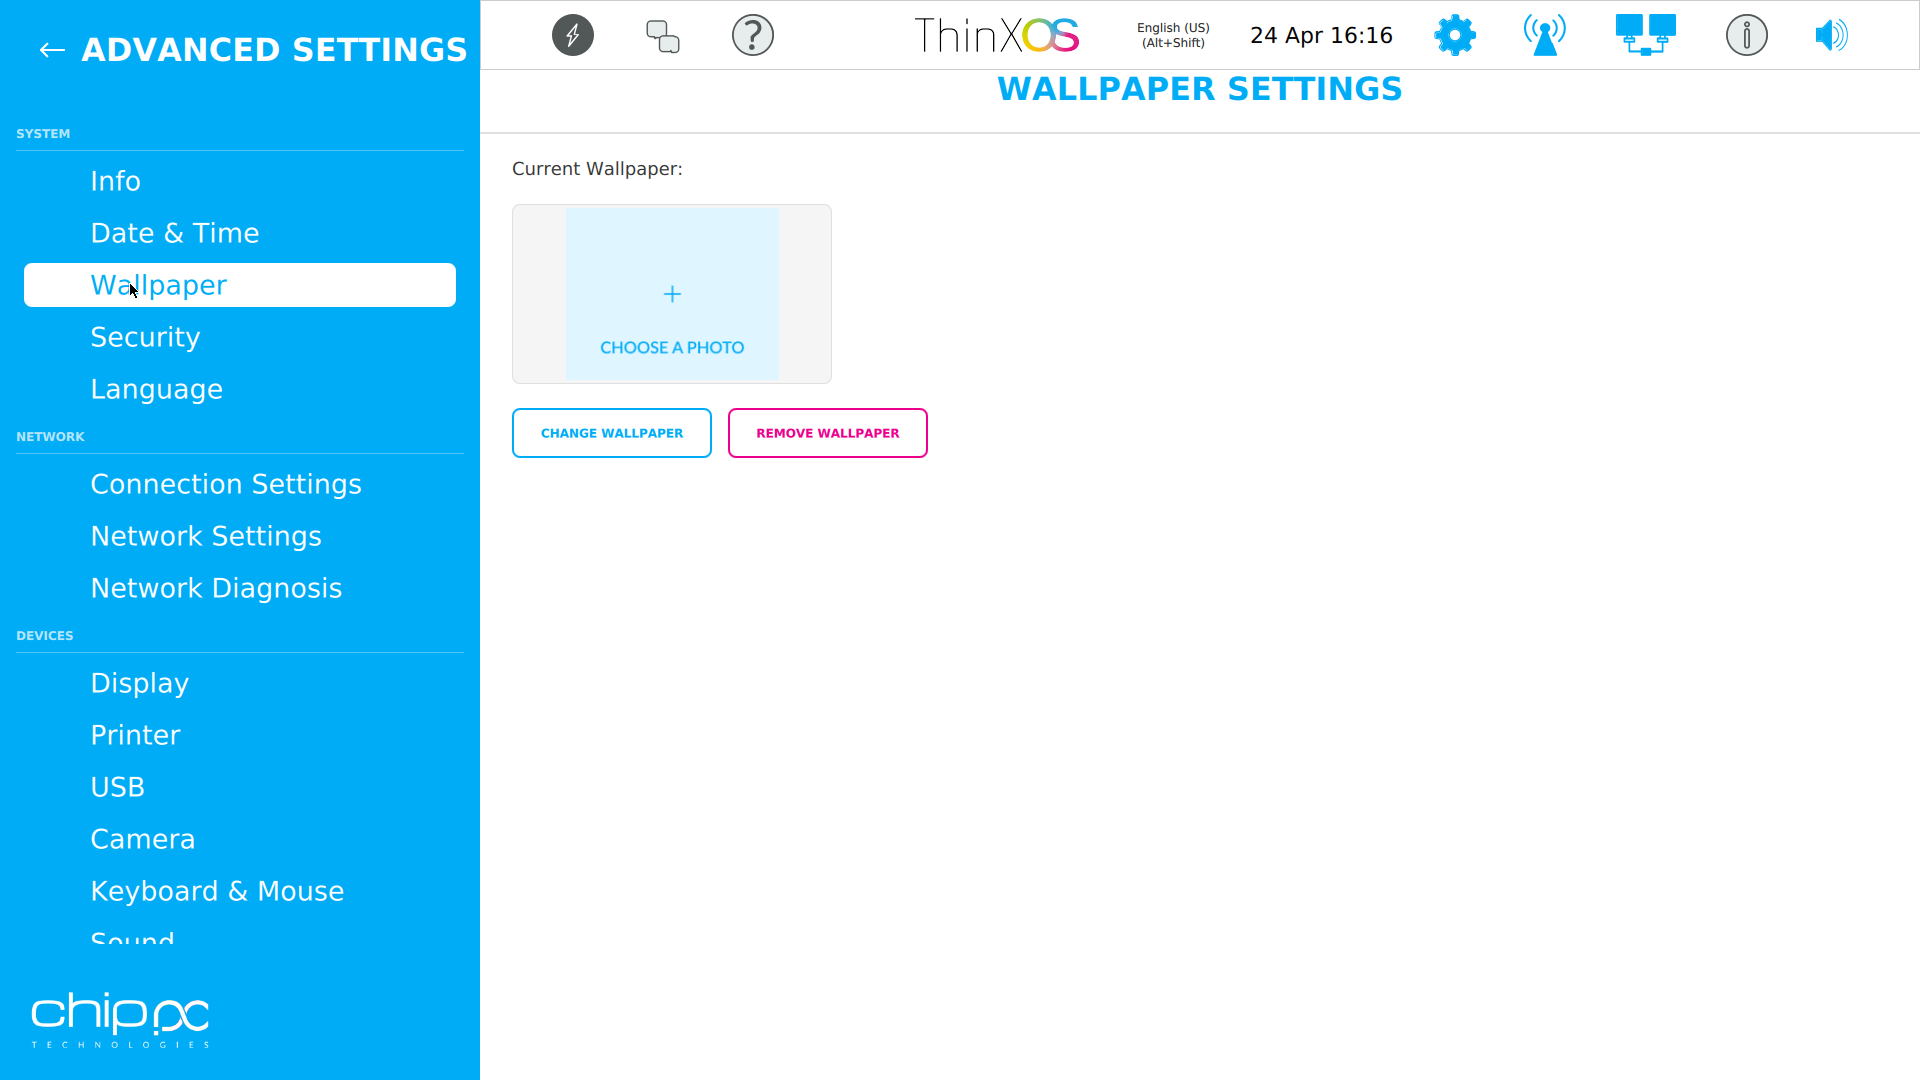
Wallpaper Fond d'écran Hintergrundbild Fondo de pantalla Papel de parede Sfondo טפט
The Wallpaper panel allows selecting or deploying a desktop background image. Corporate branding can be enforced by deploying a wallpaper image from the Xcalibur Library.
| Setting | Details |
|---|---|
| Source | Built-in wallpapers or custom upload via Xcalibur Library |
| Display Mode | Stretch, Center, Tile, Fit, or Fill to screen |
| Background Color | Solid color fallback when no image is set |
| Deploy via Xcalibur | Use the Wallpaper Upload task to push a branded background to all devices |
Le panneau Fond d'écran permet de sélectionner ou de déployer une image de fond de bureau. Le branding d'entreprise peut être imposé via la bibliothèque Xcalibur.
לוח טפט מאפשר בחירה או פריסה של תמונת רקע שולחן עבודה.
Xcalibur Integration Intégration Xcalibur Xcalibur-Integration Integración con Xcalibur Integração com Xcalibur Integrazione con Xcalibur אינטגרציה עם Xcalibur
Every ThinX OS setting described above can be managed remotely and at scale through Xcalibur tasks. Below is the complete mapping between ThinX OS settings and Xcalibur tasks:
| ThinX OS Setting | Xcalibur Task | Category |
|---|---|---|
| Screen Resolution + Refresh Rate | Screen Resolution | Display |
| Orientation | Orientation (Landscape/Portrait) | Display |
| Display Mode | Display Mode (Extend / Mirror / Single) | Display |
| Screen Sleep / Turn Off | Screen Sleep/Turn Off | Display |
| Keyboard Layout | Keyboard Layout | Input |
| Mouse Settings | Mouse Settings | Input |
| Sound Volume + Device | Sound Settings | Audio |
| VNC Password | Change VNC Password | Security |
| Advanced Settings Password | Change Advanced Settings Password | Security |
| Advanced Settings Lock | Advanced Settings | Security |
| Certificate Import | Certificate Upload / Remove Certificate | Security |
| Network Profile | Deploy Network Profile | Network |
| Wi-Fi Profile | Deploy WiFi Profile | Network |
| Static IP | Deploy Static IP Profile | Network |
| 802.1X | Deploy 802.1X Profile | Network |
| USB Classes | USB Settings | System |
| USB Whitelist/Blacklist | USB Whitelist/Blacklist | System |
| Camera | Camera Settings | System |
| Time Zone + DST | Time Zone | Date & Time |
| NTP Server | NTP Server | Date & Time |
| Time Format | Time Format (12h / 24h) | Date & Time |
| Printer (Network) | Add Network Printer / Deploy Printer | Printers |
| Printer (Remove) | Remove Printer | Printers |
| LPD Server | Enable / Disable LPD Server | Printers |
| Default Printer | Set Default Printer | Printers |
| Printing Enable | Enable / Disable Printing | Printers |
| Connection List | Deploy Connection / Remove Connection | Connections |
| Wallpaper | Wallpaper Upload | Appearance |
| System Language | Language Settings | Appearance |
| Theme | Theme (Light / Dark) | Appearance |
| Application Package | Install Package | System |
| Power | Restart / Shutdown / Power On (WoL) / Factory Reset | System |
Chaque paramètre ThinX OS décrit ci-dessus peut être géré à distance et à grande échelle via les tâches Xcalibur. Voici le mappage complet entre les paramètres ThinX OS et les tâches Xcalibur.
| Paramètre ThinX OS | Tâche Xcalibur | Catégorie |
|---|---|---|
| Résolution + Taux de rafraîchissement | Screen Resolution | Affichage |
| Orientation | Orientation (Landscape/Portrait) | Affichage |
| Mode d'affichage | Display Mode (Extend / Mirror / Single) | Affichage |
| Veille / Extinction écran | Screen Sleep/Turn Off | Affichage |
| Disposition clavier | Keyboard Layout | Saisie |
| Paramètres souris | Mouse Settings | Saisie |
| Volume + Périphérique audio | Sound Settings | Audio |
| Mot de passe VNC | Change VNC Password | Sécurité |
| Mot de passe paramètres avancés | Change Advanced Settings Password | Sécurité |
| Verrou paramètres avancés | Advanced Settings | Sécurité |
| Import certificat | Certificate Upload / Remove Certificate | Sécurité |
| Profil réseau | Deploy Network Profile / WiFi / Static IP / 802.1X | Réseau |
| USB classes | USB Settings / USB Whitelist/Blacklist | Système |
| Caméra | Camera Settings | Système |
| Fuseau horaire + NTP | Time Zone / NTP Server / Time Format | Date & Heure |
| Imprimantes | Add Network Printer / Deploy Printer / Remove Printer | Imprimantes |
| Connexions | Deploy Connection / Remove Connection | Connexions |
| Alimentation | Restart / Shutdown / Power On (WoL) / Factory Reset | Système |
כל הגדרת ThinX OS שתוארה לעיל ניתנת לניהול מרחוק ובקנה מידה דרך משימות Xcalibur.