UpdatesMises à jourUpdatesActualizacionesAtualizaçõesAggiornamentiעדכונים
Agent / Client UpdatesMises à jour agents / clientsAgenten- / Client-UpdatesActualizaciones de agentes / clientesAtualizações de agentes / clientesAggiornamenti agenti / clientעדכוני Agent / Client
Firmware and OS updates for managed devices are handled through the Library. The process:
- Upload update file(s) to the Library
- Create a "Deploy Update" task targeting the desired device groups
- Schedule or execute immediately
- Xcalibur pushes the update via the TCP agent channel
- Monitor progress in the task execution history
Les mises à jour firmware et OS pour les appareils gérés sont gérées via la Bibliothèque. Le processus :
- Uploader le(s) fichier(s) de mise à jour dans la Bibliothèque
- Créer une tâche "Déployer la mise à jour" ciblant les groupes d'appareils souhaités
- Planifier ou exécuter immédiatement
- Xcalibur pousse la mise à jour via le canal agent TCP
- Surveiller la progression dans l'historique d'exécution des tâches
- Update-Datei in die Bibliothek hochladen
- Aufgabe "Update bereitstellen" erstellen
- Planen oder sofort ausführen
- Fortschritt überwachen
- Subir archivo de actualización a la Biblioteca
- Crear tarea "Implementar actualización"
- Programar o ejecutar inmediatamente
- Supervisar el progreso
- Carregar ficheiro de atualização para a Biblioteca
- Criar tarefa "Implementar atualização"
- Agendar ou executar imediatamente
- Monitorizar o progresso
- Caricare il file di aggiornamento nella Libreria
- Creare attività "Distribuisci aggiornamento"
- Pianificare o eseguire immediatamente
- Monitorare il progresso
עדכוני firmware ומערכת הפעלה למכשירים מנוהלים מטופלים דרך Library (הספרייה). התהליך:
- העלה קובץ/י עדכון לספרייה
- צור משימת "Deploy Update" המכוונת לקבוצות המכשירים הרצויות
- תזמן או הרץ מיידית
- Xcalibur דוחף את העדכון דרך ערוץ ה-TCP של ה-Agent
- עקוב אחר ההתקדמות בהיסטוריית הרצת המשימות
Server Self-Update Auto-mise à jour du serveur Server-Selbst-Update Autoactualización del servidor Auto-atualização do servidor Auto-aggiornamento del server עדכון עצמי של השרת
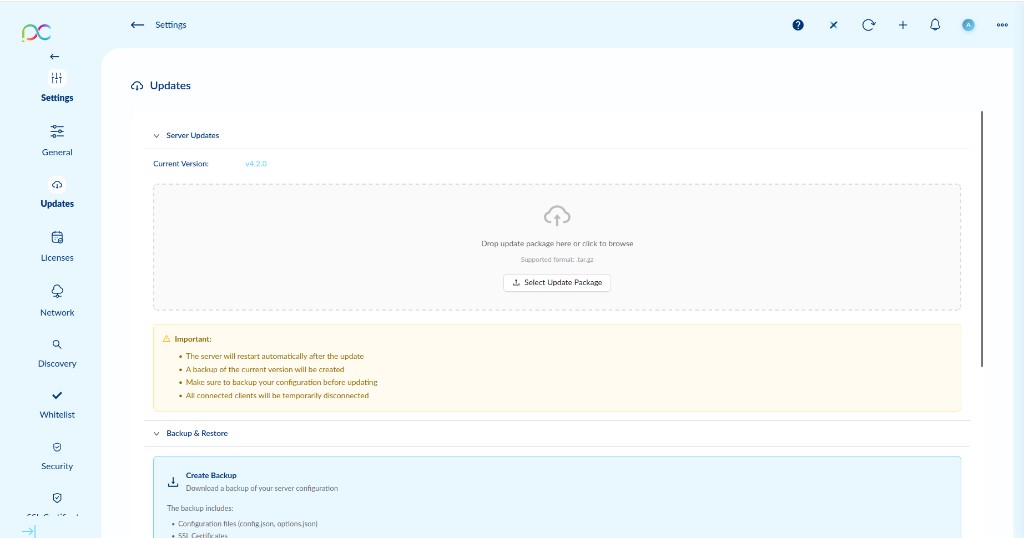
Go to Settings → Updates → Server Updates to update the Xcalibur server itself. The current version is displayed at the top.
- Drag and drop the update package (
.tar.gz) into the upload zone, or click Select Update Package to browse. - Click Apply to start the update process.
- The server will restart automatically after the update.
- A backup of the current version will be created automatically.
- Make sure to backup your configuration before updating (see Backup & Restore below).
- All connected clients will be temporarily disconnected.
Allez dans Paramètres → Mises à jour → Server Updates. La version actuelle est affichée en haut.
- Glissez-déposez le package de mise à jour (
.tar.gz) dans la zone d'upload, ou cliquez sur Select Update Package. - Cliquez sur Apply pour lancer la mise à jour.
- Le serveur redémarre automatiquement après la mise à jour.
- Une sauvegarde de la version actuelle sera créée automatiquement.
- Effectuez une sauvegarde de votre configuration avant la mise à jour (voir ci-dessous).
- Tous les clients connectés seront temporairement déconnectés.
Einstellungen → Updates → Server Updates. Aktuelle Version wird oben angezeigt. Paket (.tar.gz) hochladen, dann Apply klicken. Wichtig: Server startet automatisch neu, Backup wird erstellt, alle Clients werden kurz getrennt. Vorher Konfiguration sichern.
Configuración → Actualizaciones → Server Updates. Versión actual mostrada arriba. Cargar paquete (.tar.gz), luego Apply. Importante: el servidor se reinicia automáticamente, se crea un backup, todos los clientes se desconectan temporalmente. Haga una copia de seguridad antes.
Definições → Atualizações → Server Updates. Versão atual apresentada no topo. Carregue o pacote (.tar.gz), depois Apply. Importante: o servidor reinicia automaticamente, é criado um backup, todos os clientes são temporariamente desligados. Faça um backup antes.
Impostazioni → Aggiornamenti → Server Updates. Versione corrente mostrata in cima. Caricare il pacchetto (.tar.gz), poi Apply. Importante: il server si riavvia automaticamente, viene creato un backup, tutti i client vengono temporaneamente disconnessi. Eseguire un backup prima.
הגדרות ← עדכונים ← Server Updates. הגרסה הנוכחית מוצגת בחלק העליון. גרור את החבילה (.tar.gz) ולחץ Apply. חשוב: השרת מופעל מחדש אוטומטית, נוצר גיבוי, כל הלקוחות מנותקים זמנית. גבה את ההגדרות לפני העדכון.
Backup & Restore Sauvegarde & Restauration Sicherung & Wiederherstellung Copia de seguridad & Restauración Backup & Restauro Backup & Ripristino גיבוי & שחזור
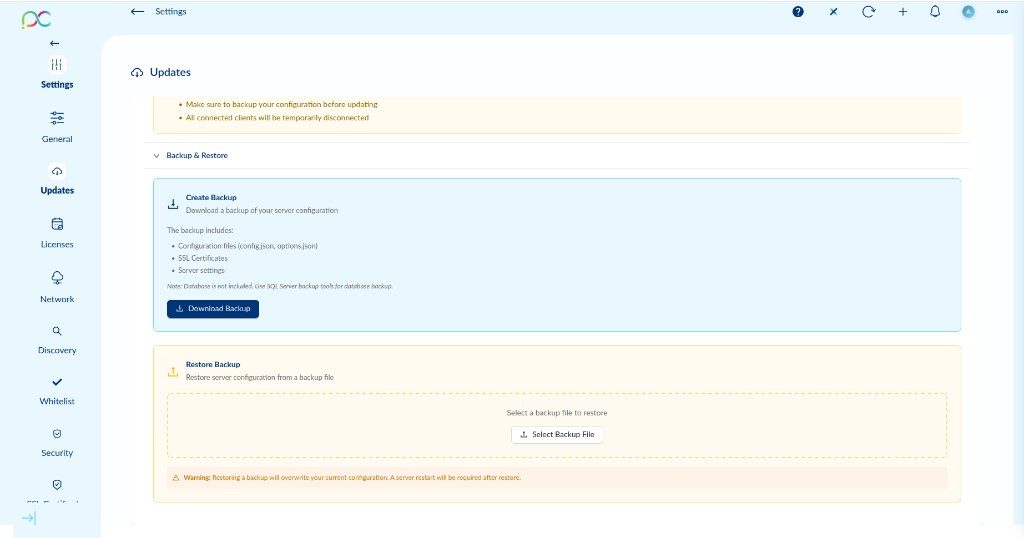
Create Backup
Click Download Backup to download a backup archive of the server configuration. The backup includes:
- Configuration files (
config.json,options.json) - SSL Certificates
- Server settings
Restore Backup
To restore a previous configuration:
- Click Select Backup File and choose the backup archive you downloaded previously.
- Confirm the restore operation.
Créer une sauvegarde
Cliquez sur Download Backup pour télécharger une archive de la configuration du serveur. La sauvegarde inclut : fichiers de configuration (config.json, options.json), certificats SSL, paramètres serveur.
Restaurer une sauvegarde
- Cliquez sur Select Backup File et choisissez l'archive de sauvegarde.
- Confirmez la restauration.
Backup erstellen: Download Backup klicken — enthält config.json, options.json, SSL-Zertifikate, Servereinstellungen (Datenbank nicht enthalten, separat sichern). Wiederherstellen: Select Backup File → Backup-Archiv auswählen → bestätigen. Achtung: Aktuelle Konfiguration wird überschrieben, Server-Neustart erforderlich.
Crear backup: Download Backup — incluye config.json, options.json, certificados SSL, configuración del servidor (base de datos no incluida, hacer backup por separado). Restaurar: Select Backup File → elegir archivo → confirmar. Aviso: la configuración actual se sobrescribirá, se necesita reinicio del servidor.
Criar backup: Download Backup — inclui config.json, options.json, certificados SSL, definições do servidor (base de dados não incluída, fazer backup separadamente). Restaurar: Select Backup File → escolher ficheiro → confirmar. Aviso: a configuração atual será substituída, é necessário reiniciar o servidor.
Creare backup: Download Backup — include config.json, options.json, certificati SSL, impostazioni server (database non incluso, eseguire backup separato). Ripristinare: Select Backup File → scegliere file → confermare. Attenzione: la configurazione attuale verrà sovrascritta, è necessario riavviare il server.
יצירת גיבוי: Download Backup — כולל config.json, options.json, אישורי SSL, הגדרות שרת (מסד נתונים לא נכלל, יש לגבות בנפרד). שחזור: Select Backup File ← בחר קובץ ← אשר. אזהרה: ההגדרות הנוכחיות יוחלפו, נדרשת הפעלה מחדש של השרת.