SSL/TLS Certificates Certificats SSL/TLS SSL/TLS-Zertifikate Certificados SSL/TLS Certificados SSL/TLS Certificati SSL/TLS אישורי SSL/TLS
Current SSL Certificate Certificat SSL actuel Aktuelles SSL-Zertifikat Certificado SSL actual Certificado SSL atual Certificato SSL corrente אישור SSL נוכחי
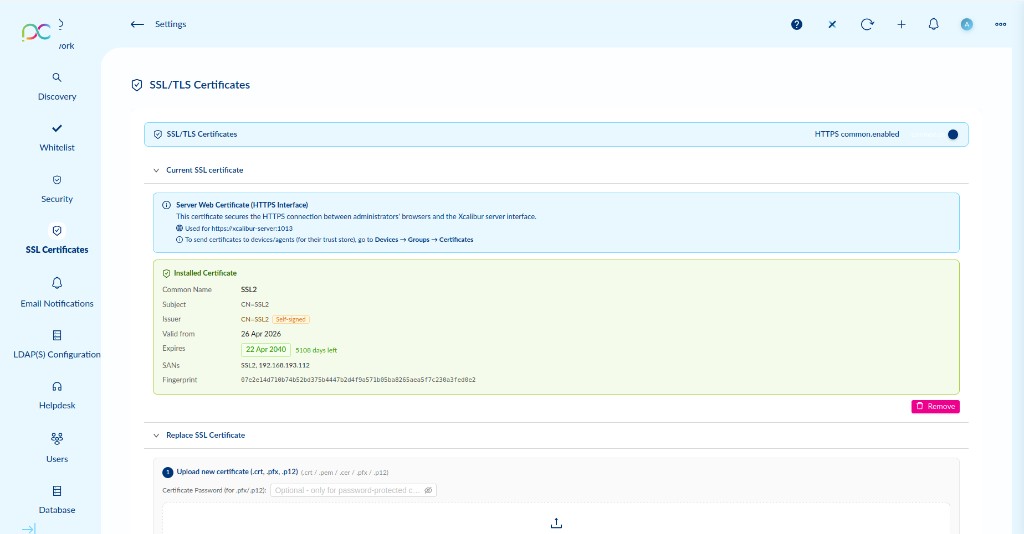
Access via Settings → SSL Certificates. This page manages the HTTPS certificate used to secure the Xcalibur admin web interface and the agent communication channel.
HTTPS Toggle
The HTTPS toggle at the top enables or disables HTTPS for the admin interface. When enabled, the server listens on port 1013 (HTTPS). Disabling HTTPS is not recommended in production.
https://xcalibur-server:1013.To push certificates to devices/agents (for their trust store), go to Devices → Groups → Certificates.
Installed Certificate Details
| Field | Description |
|---|---|
| Common Name | The CN of the installed certificate (e.g. SSL2). |
| Subject | Full subject distinguished name (e.g. CN=SSL2). |
| Issuer | The certificate authority that issued the cert. Self-signed badge shown if the certificate is self-signed. |
| Valid from | Start date of certificate validity. |
| Expires | Expiry date with a countdown (e.g. 22 Apr 2040 — 5106 days left). |
| SANs | Subject Alternative Names — the hostnames and IPs covered by the certificate (e.g. SSL2, 192.168.193.112). |
| Fingerprint | SHA-256 fingerprint of the certificate — use this to verify the certificate identity. |
Click Remove to delete the installed certificate and revert to the default self-signed one.
Accédez via Paramètres → Certificats SSL. Gère le certificat HTTPS utilisé pour sécuriser l'interface web admin Xcalibur.
Toggle HTTPS
Le toggle HTTPS en haut active ou désactive HTTPS pour l'interface admin. Quand activé, le serveur écoute sur le port 1013 (HTTPS).
https://xcalibur-server:1013.Pour pousser des certificats vers les appareils/agents (pour leur magasin de confiance), allez dans Appareils → Groupes → Certificats.
Détails du certificat installé
| Champ | Description |
|---|---|
| Common Name | Nom commun du certificat installé (ex. SSL2). |
| Subject | Nom distinctif complet du sujet (ex. CN=SSL2). |
| Issuer | Autorité de certification émettrice. Badge Self-signed si auto-signé. |
| Valid from | Date de début de validité. |
| Expires | Date d'expiration avec compte à rebours (ex. 22 Apr 2040 — 5106 jours restants). |
| SANs | Noms alternatifs — noms d'hôtes et IPs couverts par le certificat. |
| Fingerprint | Empreinte SHA-256 du certificat — à utiliser pour vérifier l'identité du certificat. |
Cliquez sur Remove pour supprimer le certificat installé et revenir au certificat auto-signé par défaut.
Einstellungen → SSL-Zertifikate. Verwaltet das HTTPS-Zertifikat für die Admin-Weboberfläche (Port 1013). HTTPS-Toggle oben aktiviert/deaktiviert HTTPS. Installiertes Zertifikat zeigt: Common Name, Subject, Issuer (Self-signed-Badge), Gültigkeitsdaten, SANs, SHA-256-Fingerabdruck. Remove-Schaltfläche zum Entfernen.
Configuración → Certificados SSL. Gestiona el certificado HTTPS para la interfaz web admin (puerto 1013). El toggle HTTPS activa/desactiva HTTPS. El certificado instalado muestra: nombre común, sujeto, emisor (badge autofirmado), fechas, SANs, huella SHA-256. Botón Remove para eliminar.
Definições → Certificados SSL. Gere o certificado HTTPS para a interface web admin (porta 1013). O toggle HTTPS ativa/desativa HTTPS. O certificado instalado mostra: nome comum, assunto, emissor (badge autoassinado), datas, SANs, impressão digital SHA-256. Botão Remove para eliminar.
Impostazioni → Certificati SSL. Gestisce il certificato HTTPS per l'interfaccia web admin (porta 1013). Il toggle HTTPS abilita/disabilita HTTPS. Il certificato installato mostra: nome comune, soggetto, emittente (badge autofirmato), date, SAN, impronta SHA-256. Pulsante Remove per rimuovere.
הגדרות ← אישורי SSL. מנהל את אישור ה-HTTPS לממשק האדמין (פורט 1013). מתג HTTPS מפעיל/משבית HTTPS. האישור המותקן מציג: שם נפוץ, נושא, מנפיק (תג Self-signed), תאריכים, SAN, טביעת אצבע SHA-256. לחצן Remove להסרה.
Replace SSL Certificate Remplacer le certificat SSL SSL-Zertifikat ersetzen Reemplazar certificado SSL Substituir certificado SSL Sostituire il certificato SSL החלפת אישור SSL
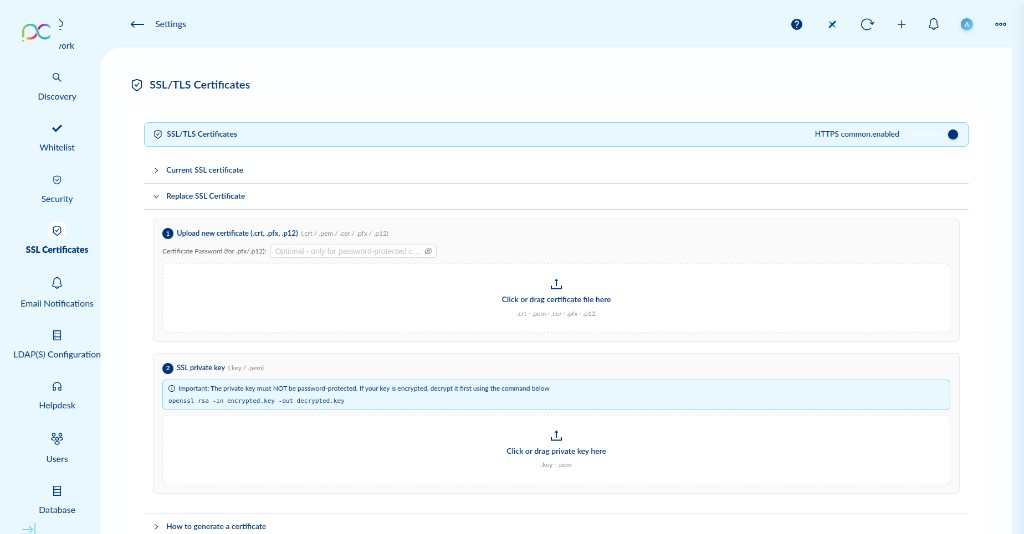
To install a new SSL certificate, expand the Replace SSL Certificate section and follow the two steps:
Step 1 — Upload Certificate File
Drag and drop or click to upload your certificate file. Accepted formats:
.crt— PEM-encoded certificate.pem— PEM bundle.cer— DER or PEM certificate.pfx/.p12— PKCS#12 bundle (contains both certificate and private key)
If uploading a .pfx or .p12 file, enter the Certificate Password if the file is password-protected.
Step 2 — Upload SSL Private Key
If you uploaded a .crt, .pem, or .cer file in Step 1, you must also upload the corresponding private key (.key or .pem).
openssl rsa -in encrypted.key -out decrypted.key
Once both files are uploaded, the HTTPS service will restart automatically with the new certificate.
Pour installer un nouveau certificat SSL, développez la section Replace SSL Certificate et suivez les deux étapes :
Étape 1 — Uploader le fichier certificat
Glissez-déposez ou cliquez pour uploader votre fichier certificat. Formats acceptés : .crt, .pem, .cer, .pfx / .p12 (bundle PKCS#12 contenant certificat et clé).
Pour les fichiers .pfx / .p12 protégés par mot de passe, saisissez le Certificate Password.
Étape 2 — Uploader la clé privée SSL
Si vous avez uploadé un .crt, .pem ou .cer, vous devez aussi uploader la clé privée (.key ou .pem).
openssl rsa -in encrypted.key -out decrypted.key
Une fois les deux fichiers uploadés, le service HTTPS redémarre automatiquement avec le nouveau certificat.
SSL-Zertifikat ersetzen — 2 Schritte: (1) Zertifikatsdatei hochladen (.crt, .pem, .cer oder .pfx/.p12). Bei .pfx/.p12 optional Passwort eingeben. (2) Privaten Schlüssel hochladen (.key/.pem) — muss passwortfrei sein (ggf. entschlüsseln: openssl rsa -in encrypted.key -out decrypted.key). HTTPS-Dienst startet automatisch neu.
Reemplazar certificado SSL — 2 pasos: (1) Subir archivo de certificado (.crt, .pem, .cer o .pfx/.p12). Para .pfx/.p12 ingresar contraseña si está protegido. (2) Subir clave privada (.key/.pem) — no debe estar protegida por contraseña (descifrar si es necesario: openssl rsa -in encrypted.key -out decrypted.key). El servicio HTTPS se reinicia automáticamente.
Substituir certificado SSL — 2 passos: (1) Carregar ficheiro de certificado (.crt, .pem, .cer ou .pfx/.p12). Para .pfx/.p12 introduzir palavra-passe se protegido. (2) Carregar chave privada (.key/.pem) — não deve ter palavra-passe (desencriptar se necessário: openssl rsa -in encrypted.key -out decrypted.key). O serviço HTTPS reinicia automaticamente.
Sostituire certificato SSL — 2 passaggi: (1) Caricare file certificato (.crt, .pem, .cer o .pfx/.p12). Per .pfx/.p12 inserire password se protetto. (2) Caricare chiave privata (.key/.pem) — non deve essere protetta da password (decifrare se necessario: openssl rsa -in encrypted.key -out decrypted.key). Il servizio HTTPS si riavvia automaticamente.
החלפת אישור SSL — 2 שלבים: (1) העלאת קובץ אישור (.crt, .pem, .cer או .pfx/.p12). עבור .pfx/.p12 הזן סיסמה אם מוגן. (2) העלאת מפתח פרטי (.key/.pem) — לא יכול להיות מוגן בסיסמה (פענח אם נדרש: openssl rsa -in encrypted.key -out decrypted.key). שירות HTTPS מופעל מחדש אוטומטית.
How to Generate a Certificate Comment générer un certificat Zertifikat generieren Cómo generar un certificado Como gerar um certificado Come generare un certificato כיצד ליצור אישור
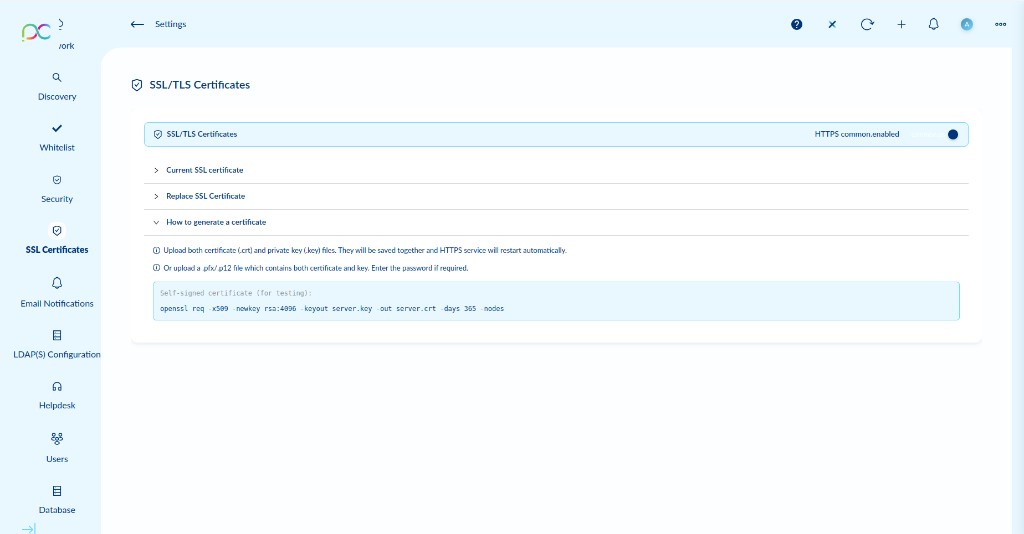
Expanding How to generate a certificate shows two upload methods and a quick-start command for testing:
Two upload methods
- Separate files: Upload both
.crt(certificate) and.key(private key) files. They are saved together and the HTTPS service restarts automatically. - Bundle file: Upload a
.pfx/.p12file which contains both certificate and key. Enter the password if required.
Generate a self-signed certificate (for testing)
Use this OpenSSL command to generate a self-signed certificate valid for 365 days:
openssl req -x509 -newkey rsa:4096 -keyout server.key -out server.crt -days 365 -nodes
This generates two files: server.crt (certificate) and server.key (private key). Upload both in the Replace SSL Certificate section above.
Using Let's Encrypt (production)
For production environments, use a free certificate from Let's Encrypt with certbot:
certbot certonly --standalone -d xcalibur.yourdomain.com
Then upload the generated fullchain.pem (as certificate) and privkey.pem (as private key) via the Replace SSL Certificate section.
La section How to generate a certificate montre deux méthodes d'upload et une commande de démarrage rapide pour les tests :
Deux méthodes d'upload
- Fichiers séparés : Uploader
.crt(certificat) et.key(clé privée). Enregistrés ensemble, le service HTTPS redémarre automatiquement. - Bundle : Uploader un fichier
.pfx/.p12contenant certificat et clé. Entrer le mot de passe si requis.
Générer un certificat auto-signé (pour les tests)
openssl req -x509 -newkey rsa:4096 -keyout server.key -out server.crt -days 365 -nodes
Génère deux fichiers : server.crt (certificat) et server.key (clé privée). Uploadez les deux dans la section Replace SSL Certificate ci-dessus.
Selbstsigniertes Zertifikat generieren: openssl req -x509 -newkey rsa:4096 -keyout server.key -out server.crt -days 365 -nodes. Beide Dateien hochladen. Für Produktion: Let's Encrypt oder interne CA verwenden.
Generar certificado autofirmado: openssl req -x509 -newkey rsa:4096 -keyout server.key -out server.crt -days 365 -nodes. Subir ambos archivos. Para producción: usar Let's Encrypt o CA interna.
Gerar certificado autoassinado: openssl req -x509 -newkey rsa:4096 -keyout server.key -out server.crt -days 365 -nodes. Carregar ambos os ficheiros. Para produção: usar Let's Encrypt ou CA interna.
Generare certificato autofirmato: openssl req -x509 -newkey rsa:4096 -keyout server.key -out server.crt -days 365 -nodes. Caricare entrambi i file. Per produzione: usare Let's Encrypt o CA interna.
יצירת אישור עצמי: openssl req -x509 -newkey rsa:4096 -keyout server.key -out server.crt -days 365 -nodes. העלה את שני הקבצים. לסביבת ייצור: השתמש ב-Let's Encrypt או CA פנימי.