UsersUtilisateursBenutzerUsuariosUtilizadoresUtentiמשתמשים
How to add a User & set Permissions Comment ajouter un Utilisateur & définir les permissions Benutzer hinzufügen & Berechtigungen festlegen Cómo añadir un Usuario y establecer permisos Como adicionar um Utilizador e definir permissões Come aggiungere un Utente e impostare i permessi כיצד להוסיף משתמש ולהגדיר הרשאות
User List Liste des utilisateurs Benutzerliste Lista de usuarios Lista de utilizadores Lista utenti רשימת משתמשים
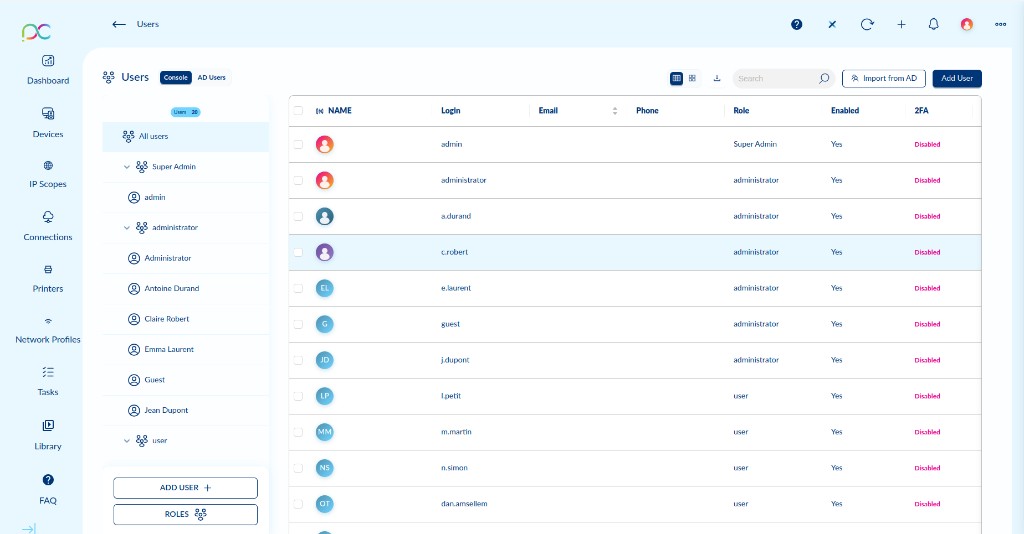
Access via Settings → Users. The Users page manages all administrator accounts for the Xcalibur admin console. It has two tabs:
- Console — Local admin accounts created directly in Xcalibur.
- AD Users — Admin accounts imported from Active Directory (requires LDAP configuration — see Settings → LDAP(S)).
User List Columns
| Column | Description |
|---|---|
| Name | Display name of the admin user. |
| Login | Username used to log in to the admin console. |
| Email address associated with the account. | |
| Phone | Optional phone number for the user. |
| Role | The role assigned to this user (e.g. Super Admin, Administrator, custom role). |
| Enabled | Whether the account is active (Yes / No). |
| 2FA | Two-factor authentication status — Disabled or Enabled. |
Left Panel
The left panel shows a tree of users grouped by role. Use it to filter the list by role group. Buttons at the bottom:
- ADD USER + — Opens the user creation form.
- ROLES — Opens the Role Settings panel to manage roles and permissions.
Toolbar Actions
- Import from AD — Import Active Directory users as console admin accounts (see Import from AD section below).
- Add User — Create a new local console admin account.
- Search — Filter users by name, login or email.
- Export (↓) — Export the user list.
- View toggle — Switch between grid and list view.
Accédez via Paramètres → Utilisateurs. Gère tous les comptes administrateurs de la console Xcalibur. Deux onglets : Console (comptes locaux) et AD Users (comptes importés depuis AD).
| Colonne | Description |
|---|---|
| Name | Nom d'affichage de l'administrateur. |
| Login | Nom d'utilisateur pour la connexion à la console admin. |
| Adresse email du compte. | |
| Role | Rôle assigné (ex. Super Admin, Administrator, rôle personnalisé). |
| Enabled | Indique si le compte est actif. |
| 2FA | Statut de l'authentification à deux facteurs — Disabled ou Enabled. |
Panneau gauche : arborescence des utilisateurs par rôle. Boutons ADD USER + et ROLES. Barre d'outils : Import from AD, Add User, recherche, export.
Einstellungen → Benutzer. Zwei Tabs: Console (lokale Konten) und AD Users (AD-Import). Spalten: Name, Login, Email, Telefon, Rolle, Aktiviert, 2FA. Linkes Panel: Benutzer nach Rolle gruppiert, Schaltflächen ADD USER und ROLES. Symbolleiste: Import from AD, Add User, Suche, Export.
Configuración → Usuarios. Dos pestañas: Console (cuentas locales) y AD Users (importación AD). Columnas: Nombre, Login, Email, Teléfono, Rol, Habilitado, 2FA. Panel izquierdo: usuarios agrupados por rol, botones ADD USER y ROLES. Barra de herramientas: Import from AD, Add User, búsqueda, exportar.
Definições → Utilizadores. Dois separadores: Console (contas locais) e AD Users (importação AD). Colunas: Nome, Login, Email, Telefone, Função, Ativado, 2FA. Painel esquerdo: utilizadores agrupados por função, botões ADD USER e ROLES. Barra de ferramentas: Import from AD, Add User, pesquisa, exportar.
Impostazioni → Utenti. Due schede: Console (account locali) e AD Users (importazione AD). Colonne: Nome, Login, Email, Telefono, Ruolo, Abilitato, 2FA. Pannello sinistro: utenti raggruppati per ruolo, pulsanti ADD USER e ROLES. Barra degli strumenti: Import from AD, Add User, ricerca, esporta.
הגדרות ← משתמשים. שני לשוניות: Console (חשבונות מקומיים) ו-AD Users (ייבוא מ-AD). עמודות: שם, כניסה, אימייל, טלפון, תפקיד, מופעל, 2FA. לוח שמאלי: משתמשים מקובצים לפי תפקיד, כפתורי ADD USER ו-ROLES. סרגל כלים: Import from AD, Add User, חיפוש, ייצוא.
User Roles & Permissions Rôles et permissions utilisateurs Benutzerrollen & Berechtigungen Roles y permisos de usuario Funções e permissões de utilizador Ruoli e permessi utente תפקידים והרשאות משתמשים
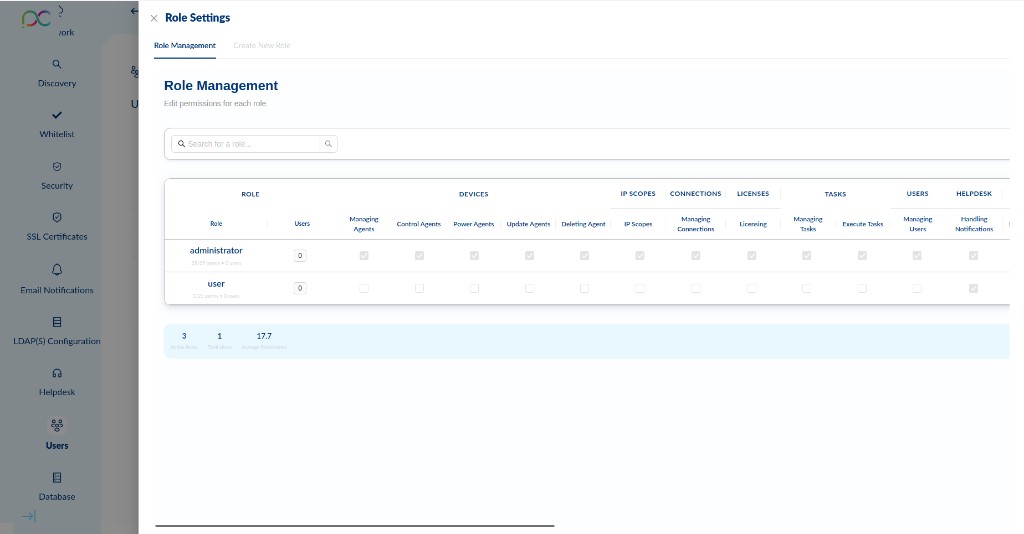
Click ROLES in the left panel to open Role Settings. It has two tabs: Role Management and Create New Role.
Role Management Tab
The Role Management tab shows all existing roles with a permission matrix. Each row is a role; each column is a permission category. Checkboxes show which permissions are granted.
Permission Categories
| Category | Permissions included |
|---|---|
| Devices | Managing Agents, Control Agents, Power Agents, Update Agents, Deleting Agent |
| IP Scopes | IP Scopes — view and manage IP ranges |
| Connections | Managing Connections — create/edit/delete connections |
| Licenses | Licensing — manage licenses |
| Tasks | Managing Tasks, Execute Tasks |
| Users | Managing Users — create/edit/delete admin users |
| Helpdesk | Handling Notifications — getting and closing notifications |
| Reports | Reports Admin — generate reports, templates, schedules |
| Settings | Server Settings, Email, LDAP, Database, Updates, Scheduler, Whitelist |
| Accounts | Accounts — create/edit/delete accounts |
| Remote Control | Remote Control, Remote Control Direct |
| Automation Rules | Automation Rules — create and manage automation rules |
Cliquez sur ROLES dans le panneau gauche pour ouvrir les paramètres des rôles. Deux onglets : Role Management (matrice de permissions) et Create New Role.
Chaque ligne est un rôle, chaque colonne une catégorie de permissions. Les cases cochées indiquent les permissions accordées.
| Catégorie | Permissions incluses |
|---|---|
| Devices | Utilisateurs, Gestion agents, Contrôle agents, Power agents, Mise à jour agents, Suppression agent |
| IP Scopes | Voir et gérer les plages IP |
| Connections | Créer/modifier/supprimer des connexions |
| Licenses | Gestion des licences |
| Tasks | Gestion des tâches, Exécution des tâches |
| Users | Créer/modifier/supprimer des utilisateurs admin |
| Helpdesk | Gestion des notifications |
ROLES-Schaltfläche öffnet Role Settings (2 Tabs: Role Management, Create New Role). Role Management zeigt Berechtigungsmatrix: jede Zeile = Rolle, jede Spalte = Kategorie (Geräte, IP-Bereiche, Verbindungen, Lizenzen, Aufgaben, Benutzer, Helpdesk). Administrator hat alle Rechte; user nur Helpdesk.
El botón ROLES abre Role Settings (2 pestañas: Role Management, Create New Role). Role Management muestra la matriz de permisos: cada fila = rol, cada columna = categoría (Dispositivos, IP Scopes, Conexiones, Licencias, Tareas, Usuarios, Helpdesk). El administrador tiene todos los permisos; user solo Helpdesk.
O botão ROLES abre as Role Settings (2 separadores: Role Management, Create New Role). Role Management mostra a matriz de permissões: cada linha = função, cada coluna = categoria (Dispositivos, IP Scopes, Ligações, Licenças, Tarefas, Utilizadores, Helpdesk). O administrador tem todas as permissões; user apenas Helpdesk.
Il pulsante ROLES apre Role Settings (2 schede: Role Management, Create New Role). Role Management mostra la matrice dei permessi: ogni riga = ruolo, ogni colonna = categoria (Dispositivi, IP Scopes, Connessioni, Licenze, Attività, Utenti, Helpdesk). L'amministratore ha tutti i permessi; user solo Helpdesk.
כפתור ROLES פותח Role Settings (2 לשוניות: Role Management, Create New Role). Role Management מציג מטריצת הרשאות: כל שורה = תפקיד, כל עמודה = קטגוריה (מכשירים, IP Scopes, חיבורים, רישיונות, משימות, משתמשים, Helpdesk). למנהל המערכת יש כל ההרשאות; למשתמש רק Helpdesk.
Create New Role Créer un nouveau rôle Neue Rolle erstellen Crear nuevo rol Criar nova função Crea nuovo ruolo יצירת תפקיד חדש
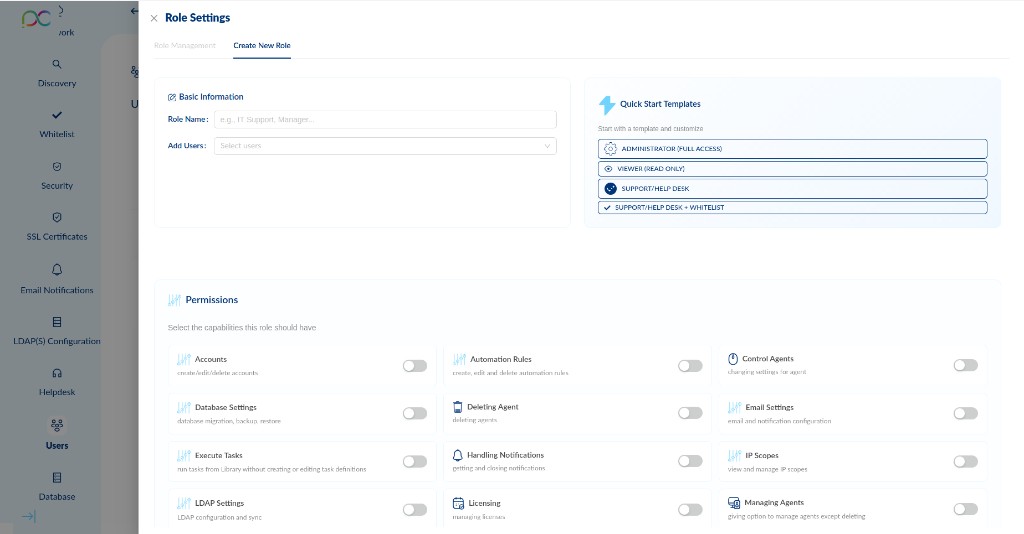
Basic Information
- Role Name — Descriptive name for the role (e.g. IT Support, Managers).
- Add Users — Assign existing users to this role immediately.
Quick Start Templates
Start from a pre-configured template and customise:
| Template | What it grants |
|---|---|
| ADMINISTRATOR (FULL ACCESS) | All permissions enabled. |
| VIEWER (READ ONLY) | Read-only access — no modifications allowed. |
| SUPPORT/HELP DESK | Helpdesk, View Devices, Reports access. |
| SUPPORT/HELP DESK + WHITELIST | Helpdesk + Whitelist management. |
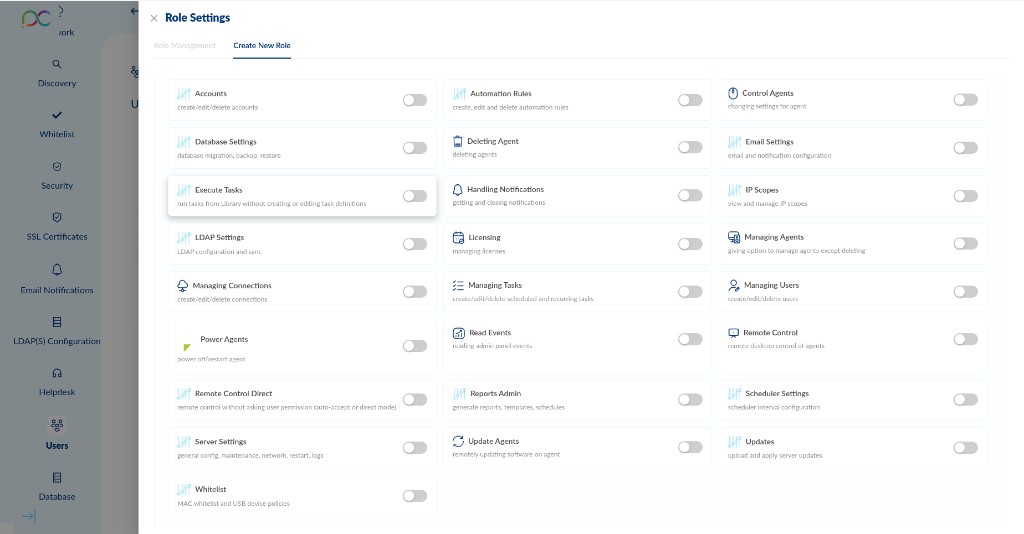
Individual Permissions
Toggle each permission independently. Each has a short description of what it allows:
| Permission | Description |
|---|---|
| Accounts | Create/edit/delete accounts. |
| Automation Rules | Create, edit and delete automation rules. |
| Control Agents | Changing settings for agents. |
| Database Settings | Database migration, backup, restore. |
| Deleting Agent | Delete agents from the fleet. |
| Email Settings | Email and notification configuration. |
| Execute Tasks | Run tasks from Library without creating or editing task definitions. |
| Handling Notifications | Getting and closing notifications. |
| IP Scopes | View and manage IP scopes. |
| LDAP Settings | LDAP configuration and sync. |
| Licensing | Managing licenses. |
| Managing Agents | Manage agents except deleting. |
| Managing Connections | Create/edit/delete connections. |
| Managing Tasks | Create/edit/delete scheduled and recurring tasks. |
| Managing Users | Create/edit/delete admin users. |
| Power Agents | Power off/restart agents. |
| Read Events | Reading admin panel events. |
| Remote Control | Remote desktop control of agents. |
| Remote Control Direct | Remote control without asking user permission (auto-accept or direct mode). |
| Reports Admin | Generate reports, templates, schedules. |
| Scheduler Settings | Scheduler interval configuration. |
| Server Settings | General config, maintenance, network, restart, logs. |
| Update Agents | Remotely update software on agents. |
| Updates | Upload and apply server updates. |
| Whitelist | MAC whitelist and USB device policies. |
Informations de base
- Role Name — Nom descriptif du rôle (ex. IT Support, Managers).
- Add Users — Affecter des utilisateurs existants à ce rôle immédiatement.
Modèles Quick Start
| Modèle | Permissions accordées |
|---|---|
| ADMINISTRATOR (FULL ACCESS) | Toutes les permissions activées. |
| VIEWER (READ ONLY) | Accès lecture seule — aucune modification. |
| SUPPORT/HELP DESK | Helpdesk, Voir appareils, Rapports. |
| SUPPORT/HELP DESK + WHITELIST | Helpdesk + gestion de la liste blanche. |
Permissions individuelles (25)
Activez/désactivez chaque permission indépendamment : Accounts, Automation Rules, Control Agents, Database Settings, Deleting Agent, Email Settings, Execute Tasks, Handling Notifications, IP Scopes, LDAP Settings, Licensing, Managing Agents, Managing Connections, Managing Tasks, Managing Users, Power Agents, Read Events, Remote Control, Remote Control Direct, Reports Admin, Scheduler Settings, Server Settings, Update Agents, Updates, Whitelist.
Neue Rolle erstellen: Rollenname + Benutzer zuweisen. Quick-Start-Vorlagen: ADMINISTRATOR (Vollzugriff), VIEWER (Nur-Lesen), SUPPORT/HELP DESK, SUPPORT/HELP DESK + WHITELIST. 24 individuelle Berechtigungen per Toggle: Konten, Automatisierungsregeln, Agenten steuern, Datenbankeinstellungen, Agent löschen, E-Mail-Einstellungen, Aufgaben ausführen, Benachrichtigungen verwalten, IP-Bereiche, LDAP, Lizenzierung, Agenten verwalten, Verbindungen, Aufgaben, Benutzer, Agenten an/aus, Ereignisse lesen, Fernsteuerung, Direkte Fernsteuerung, Berichte, Planer, Servereinstellungen, Agenten aktualisieren, Updates, Whitelist.
Crear nuevo rol: nombre del rol + asignar usuarios. Plantillas Quick Start: ADMINISTRATOR (acceso completo), VIEWER (solo lectura), SUPPORT/HELP DESK, SUPPORT/HELP DESK + WHITELIST. 24 permisos individuales por toggle: Cuentas, Reglas de automatización, Control agentes, Config BD, Eliminar agente, Config email, Ejecutar tareas, Notificaciones, IP Scopes, LDAP, Licencias, Gestionar agentes, Conexiones, Tareas, Usuarios, Power agentes, Leer eventos, Control remoto, Control remoto directo, Informes, Programador, Config servidor, Actualizar agentes, Actualizaciones, Whitelist.
Criar nova função: nome + atribuir utilizadores. Modelos Quick Start: ADMINISTRATOR (acesso total), VIEWER (só leitura), SUPPORT/HELP DESK, SUPPORT/HELP DESK + WHITELIST. 24 permissões individuais por toggle: Contas, Regras automação, Controlo agentes, Config BD, Eliminar agente, Config email, Executar tarefas, Notificações, IP Scopes, LDAP, Licenças, Gerir agentes, Ligações, Tarefas, Utilizadores, Power agentes, Ler eventos, Controlo remoto, Controlo remoto direto, Relatórios, Agendador, Config servidor, Atualizar agentes, Atualizações, Whitelist.
Crea nuovo ruolo: nome + assegna utenti. Modelli Quick Start: ADMINISTRATOR (accesso completo), VIEWER (sola lettura), SUPPORT/HELP DESK, SUPPORT/HELP DESK + WHITELIST. 24 permessi individuali per toggle: Account, Regole automazione, Controllo agenti, Config DB, Elimina agente, Config email, Esegui attività, Notifiche, IP Scopes, LDAP, Licenze, Gestione agenti, Connessioni, Attività, Utenti, Power agenti, Leggi eventi, Controllo remoto, Controllo remoto diretto, Report, Schedulatore, Config server, Aggiorna agenti, Aggiornamenti, Whitelist.
יצירת תפקיד חדש: שם תפקיד + שיוך משתמשים. תבניות Quick Start: ADMINISTRATOR (גישה מלאה), VIEWER (קריאה בלבד), SUPPORT/HELP DESK, SUPPORT/HELP DESK + WHITELIST. 24 הרשאות בודדות למתג: חשבונות, כללי אוטומציה, שליטה בסוכנים, הגדרות מסד נתונים, מחיקת סוכן, הגדרות אימייל, הרצת משימות, התראות, IP Scopes, LDAP, רישוי, ניהול סוכנים, חיבורים, משימות, משתמשים, הפעלת סוכנים, קריאת אירועים, שליטה מרחוק, שליטה מרחוק ישירה, דוחות, מתזמן, הגדרות שרת, עדכון סוכנים, עדכונים, Whitelist.
Adding a New User Ajouter un nouvel utilisateur Neuen Benutzer hinzufügen Añadir un nuevo usuario Adicionar um novo utilizador Aggiungere un nuovo utente הוספת משתמש חדש
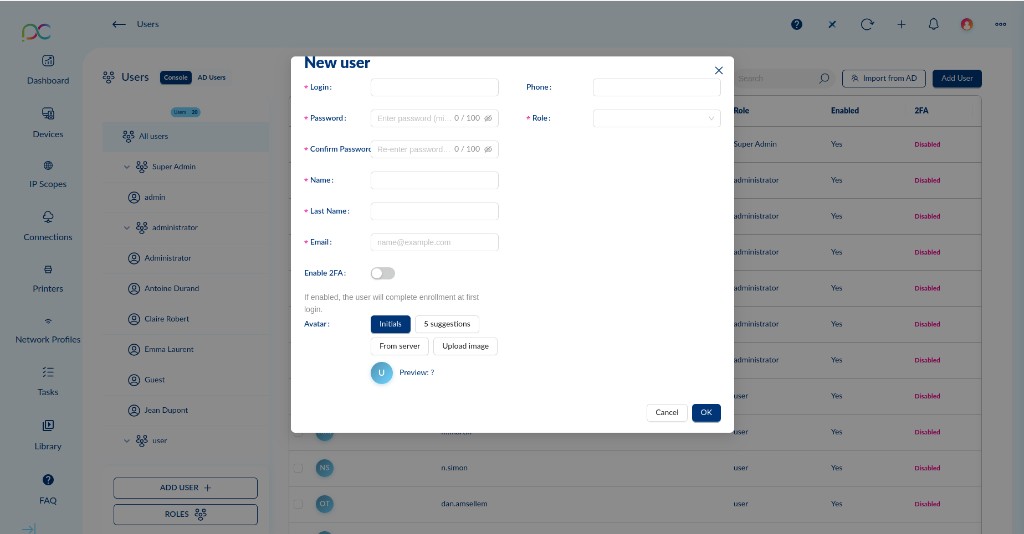
Click ADD USER + or Add User to open the New User form. Required fields are marked with *.
| Field | Description | Required |
|---|---|---|
| Login | Username for logging in to the admin console. Cannot be changed after creation. | Yes |
| Password | Password for the account (min. required characters shown). Click the eye icon to reveal. | Yes |
| Confirm Password | Must match the Password field. | Yes |
| Role | Select the role (permission group) to assign to this user. Roles are managed via the ROLES button. | Yes |
| Name | User's first name. | Yes |
| Last Name | User's last name. | Yes |
| Email address used for notifications. | No | |
| Phone | Optional phone number. | No |
| Enable 2FA | If enabled, the user will be prompted to complete 2FA enrollment on first login. | No |
| Avatar | Choose between: Initials (auto-generated from name), 5 suggestions (color avatars), From server, or Upload image. | No |
Click OK to create the user, or Cancel to discard.
Cliquez sur ADD USER + ou Add User pour ouvrir le formulaire. Les champs obligatoires sont marqués d'un *.
| Champ | Description | Obligatoire |
|---|---|---|
| Login | Nom d'utilisateur pour la connexion à la console admin. Ne peut pas être modifié après création. | Oui |
| Password | Mot de passe du compte. Cliquez sur l'icône œil pour afficher. | Oui |
| Confirm Password | Doit correspondre au champ Password. | Oui |
| Role | Sélectionnez le rôle (groupe de permissions) à assigner à cet utilisateur. | Oui |
| Name | Prénom de l'utilisateur. | Oui |
| Last Name | Nom de famille de l'utilisateur. | Oui |
| Adresse email pour les notifications. | Non | |
| Phone | Numéro de téléphone optionnel. | Non |
| Enable 2FA | Si activé, l'utilisateur devra s'inscrire au 2FA lors de sa première connexion. | Non |
| Avatar | Initiales, 5 suggestions couleur, depuis le serveur, ou upload d'image. | Non |
Cliquez sur OK pour créer l'utilisateur, ou Cancel pour annuler.
Pflichtfelder: Login (nicht änderbar), Passwort, Passwort bestätigen, Rolle, Vorname, Nachname. Optional: E-Mail, Telefon, 2FA aktivieren (Registrierung bei erster Anmeldung), Avatar (Initialen, 5 Vorschläge, Vom Server, Bild hochladen). OK zum Erstellen.
Campos obligatorios: Login (no modificable), Contraseña, Confirmar contraseña, Rol, Nombre, Apellido. Opcionales: Email, Teléfono, Activar 2FA (registro en primer inicio), Avatar (Iniciales, 5 sugerencias, Desde servidor, Subir imagen). OK para crear.
Campos obrigatórios: Login (não modificável), Senha, Confirmar senha, Função, Nome, Sobrenome. Opcionais: Email, Telefone, Ativar 2FA (registo no primeiro login), Avatar (Iniciais, 5 sugestões, Do servidor, Carregar imagem). OK para criar.
Campi obbligatori: Login (non modificabile), Password, Conferma password, Ruolo, Nome, Cognome. Opzionali: Email, Telefono, Abilita 2FA (iscrizione al primo accesso), Avatar (Iniziali, 5 suggerimenti, Dal server, Carica immagine). OK per creare.
שדות חובה: Login (לא ניתן לשינוי), סיסמה, אישור סיסמה, תפקיד, שם, שם משפחה. אופציונלי: אימייל, טלפון, הפעל 2FA (רישום בכניסה ראשונה), אווטאר (ראשי תיבות, 5 הצעות, מהשרת, העלאת תמונה). OK ליצירה.
User Settings Panel Panneau de paramètres utilisateur Benutzereinstellungspanel Panel de configuración del usuario Painel de configurações do utilizador Pannello impostazioni utente לוח הגדרות משתמש
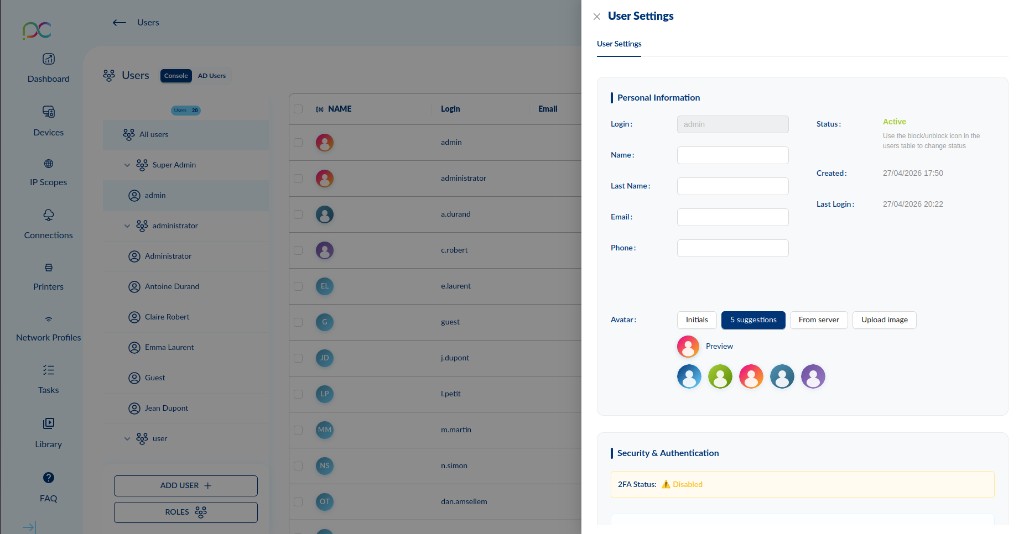
Click on a user in the list to open their User Settings panel on the right side. It shows the user's profile and security status.
Personal Information
| Field | Description |
|---|---|
| Login | The user's login name (read-only after creation). |
| Status | Active — account is enabled. Use the enable/disable icon in the users table to change status. |
| Name | User's first name (editable). |
| Created | Date and time the account was created. |
| Last Name | User's last name (editable). |
| Last Login | Date and time of the user's last successful login. |
| Email address (editable). | |
| Phone | Phone number (editable). |
| Avatar | Choose or update the user's avatar: Initials, 5 color suggestions, From server, or Upload image. |
Security & Authentication
| Field | Description |
|---|---|
| 2FA Status | ⚠ Disabled — the user has not enrolled two-factor authentication. Click to prompt enrollment or enable it for them. |
Cliquez sur un utilisateur dans la liste pour ouvrir son panneau User Settings sur la droite.
Informations personnelles
| Champ | Description |
|---|---|
| Login | Nom de connexion (lecture seule après création). |
| Status | Active — compte activé. Utilisez l'icône dans le tableau pour changer le statut. |
| Name / Last Name | Prénom et nom (modifiables). |
| Created | Date et heure de création du compte. |
| Last Login | Date et heure de la dernière connexion réussie. |
| Email / Phone | Email et téléphone (modifiables). |
| Avatar | Initiales, 5 suggestions couleur, depuis le serveur, ou upload d'image. |
Sécurité & Authentification
2FA Status : ⚠ Disabled — l'utilisateur n'a pas encore inscrit l'authentification à deux facteurs.
Klicken Sie auf einen Benutzer, um das User-Settings-Panel zu öffnen. Persönliche Informationen: Login (schreibgeschützt), Status (Aktiv/Inaktiv), Vor-/Nachname, E-Mail, Telefon, Erstellt, Letzte Anmeldung, Avatar. Sicherheit & Authentifizierung: 2FA-Status (⚠ Deaktiviert = nicht registriert).
Haga clic en un usuario para abrir el panel User Settings. Información personal: Login (solo lectura), Estado (Activo/Inactivo), Nombre, Apellido, Email, Teléfono, Creado, Último inicio de sesión, Avatar. Seguridad y autenticación: Estado 2FA (⚠ Deshabilitado = no registrado).
Clique num utilizador para abrir o painel User Settings. Informação pessoal: Login (só leitura), Estado (Ativo/Inativo), Nome, Sobrenome, Email, Telefone, Criado, Último login, Avatar. Segurança e autenticação: Estado 2FA (⚠ Desativado = não registado).
Fare clic su un utente per aprire il pannello User Settings. Informazioni personali: Login (sola lettura), Stato (Attivo/Inattivo), Nome, Cognome, Email, Telefono, Creato, Ultimo accesso, Avatar. Sicurezza e autenticazione: Stato 2FA (⚠ Disabilitato = non iscritto).
לחץ על משתמש לפתיחת לוח User Settings. מידע אישי: Login (קריאה בלבד), סטטוס (פעיל/לא פעיל), שם, שם משפחה, אימייל, טלפון, נוצר, כניסה אחרונה, אווטאר. אבטחה ואימות: סטטוס 2FA (⚠ מושבת = לא נרשם).
Import from Active Directory Importer depuis Active Directory Aus Active Directory importieren Importar desde Active Directory Importar do Active Directory Importa da Active Directory ייבוא מ-Active Directory
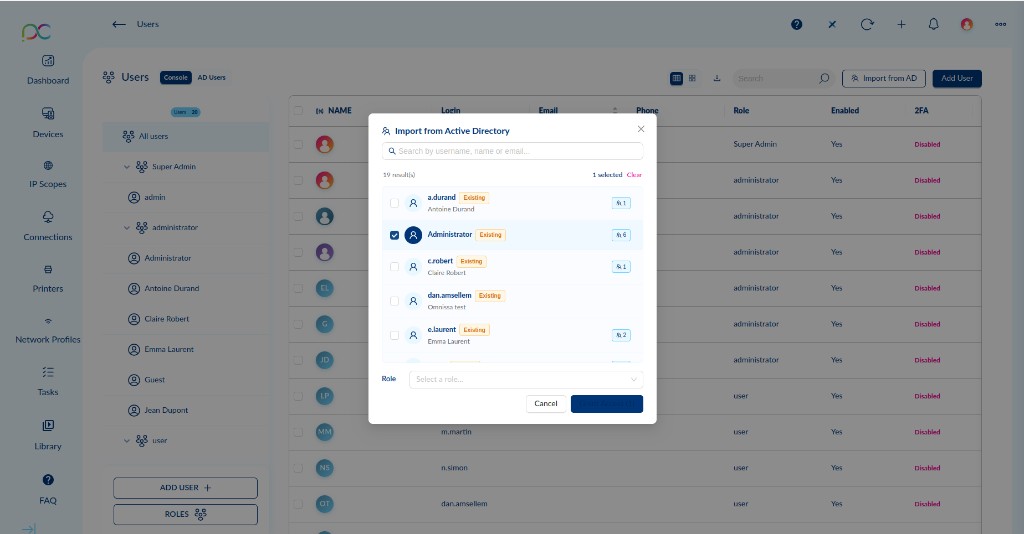
Click Import from AD in the toolbar to open the import dialog. This allows you to grant Xcalibur admin console access to Active Directory users without creating local accounts manually.
- The dialog shows all AD users available for import (e.g. 19 results). Each entry shows the username and display name.
- Users already imported as console accounts show an Existing badge — selecting them again will update their record.
- Use the Search bar to filter by username, name or email.
- Check one or more users. The selection counter (1 selected) updates in real time. Click Clear to deselect all.
- In the Role dropdown at the bottom, select the Xcalibur role to assign to the imported users.
- Click Import to create (or update) the console admin accounts.
Imported users appear in the Console tab with their assigned role. They log in using their AD credentials (if Domain Auth is configured) or a temporary password.
Cliquez sur Import from AD dans la barre d'outils pour ouvrir la boîte de dialogue d'importation. Permet d'accorder l'accès à la console admin Xcalibur aux utilisateurs Active Directory.
- La boîte de dialogue affiche tous les utilisateurs AD disponibles (ex. 19 résultats) avec nom d'utilisateur et nom d'affichage.
- Utilisez la barre de recherche pour filtrer.
- Cochez un ou plusieurs utilisateurs.
- Sélectionnez un rôle dans la liste déroulante.
- Cliquez sur Import.
Les utilisateurs importés apparaissent dans l'onglet Console avec leur rôle assigné.
Import from AD: LDAP muss konfiguriert sein. Dialog zeigt alle AD-Benutzer (z.B. 19 Ergebnisse). Benutzer auswählen, Rolle zuweisen, Importieren. Importierte Benutzer erscheinen im Console-Tab mit zugewiesener Rolle.
Import from AD: LDAP debe estar configurado. El diálogo muestra todos los usuarios AD (p.ej. 19 resultados). Seleccionar usuarios, asignar rol, Importar. Los usuarios importados aparecen en la pestaña Console con su rol asignado.
Import from AD: LDAP deve estar configurado. O diálogo mostra todos os utilizadores AD (ex. 19 resultados). Selecionar utilizadores, atribuir função, Importar. Os utilizadores importados aparecem no separador Console com a sua função atribuída.
Import from AD: LDAP deve essere configurato. Il dialogo mostra tutti gli utenti AD (es. 19 risultati). Selezionare utenti, assegnare ruolo, Importare. Gli utenti importati appaiono nel tab Console con il ruolo assegnato.
Import from AD: LDAP חייב להיות מוגדר. תיבת הדו-שיח מציגה את כל משתמשי AD (למשל 19 תוצאות). בחר משתמשים, שייך תפקיד, יבא. משתמשים מיובאים יופיעו בלשונית Console עם התפקיד המשויך.
Two-Factor Authentication (2FA) Authentification à deux facteurs (2FA) Zwei-Faktor-Authentifizierung (2FA) Autenticación de dos factores (2FA) Autenticação de dois fatores (2FA) Autenticazione a due fattori (2FA) אימות דו-שלבי (2FA)
Xcalibur supports TOTP (Time-based One-Time Password, RFC 6238) 2FA using any authenticator app (Google Authenticator, Authy, Microsoft Authenticator).
The 2FA column in the user list shows the current status for each account. A Disabled badge means the user has not enrolled 2FA yet.
- Per-user 2FA — each user can enroll 2FA from their profile settings.
- Global 2FA policy — administrators can force 2FA for all users via Settings → Security.
- Recovery codes — 10 recovery codes are generated on enrollment (SHA-256 hashed).
- Login lockout — account is locked for 15 minutes after repeated failed attempts.
Xcalibur supporte le 2FA TOTP (RFC 6238) avec toute app d'authentification. La colonne 2FA dans la liste des utilisateurs indique le statut (Disabled = non inscrit).
- 2FA par utilisateur — chaque utilisateur s'inscrit depuis ses paramètres de profil.
- Politique 2FA globale — les admins peuvent forcer le 2FA via Paramètres → Sécurité.
- Codes de récupération — 10 codes générés à l'inscription (hachés SHA-256).
- Verrouillage — 15 minutes après tentatives échouées répétées.
Xcalibur unterstützt TOTP-2FA (RFC 6238) mit jeder Authenticator-App. 2FA-Spalte zeigt Disabled/Enabled. Pro Benutzer oder global erzwingbar (Einstellungen → Sicherheit). 10 Wiederherstellungscodes (SHA-256). Kontosperrung nach Fehlversuchen (15 Minuten).
Xcalibur soporta 2FA TOTP (RFC 6238) con cualquier app autenticadora. Columna 2FA muestra Disabled/Enabled. Por usuario o forzable globalmente (Configuración → Seguridad). 10 códigos de recuperación (SHA-256). Bloqueo de cuenta tras intentos fallidos (15 minutos).
Xcalibur suporta 2FA TOTP (RFC 6238) com qualquer app autenticadora. Coluna 2FA mostra Disabled/Enabled. Por utilizador ou forçável globalmente (Definições → Segurança). 10 códigos de recuperação (SHA-256). Bloqueio de conta após tentativas falhadas (15 minutos).
Xcalibur supporta 2FA TOTP (RFC 6238) con qualsiasi app autenticatore. Colonna 2FA mostra Disabled/Enabled. Per utente o forzabile globalmente (Impostazioni → Sicurezza). 10 codici di recupero (SHA-256). Blocco account dopo tentativi falliti (15 minuti).
Xcalibur תומך ב-2FA TOTP (RFC 6238) עם כל אפליקציית אימות. עמודת 2FA מציגה Disabled/Enabled. לכל משתמש או אכיפה גלובלית (הגדרות ← אבטחה). 10 קודי שחזור (SHA-256). נעילת חשבון לאחר ניסיונות כושלים (15 דקות).
LDAP / Active Directory Integration Intégration LDAP / Active Directory LDAP / Active Directory Integration Integración LDAP / Active Directory Integração LDAP / Active Directory Integrazione LDAP / Active Directory אינטגרציה עם LDAP / Active Directory
→ Settings → LDAP(S) Configuration
→ Paramètres → Configuration LDAP(S)
Step-by-step: Adding a User Pas à pas : Ajouter un utilisateur Schritt für Schritt: Benutzer hinzufügen Paso a paso: Añadir un usuario Passo a passo: Adicionar um utilizador Passo dopo passo: Aggiungere un utente שלב אחר שלב: הוספת משתמש