First Boot & License
First boot: ThinX OS Setup Premier démarrage : assistant ThinX OS Erster Start: ThinX OS Setup Primer arranque: asistente ThinX OS Primeiro arranque: assistente ThinX OS Primo avvio: configurazione ThinX OS אתחול ראשון: אשף ThinX OS
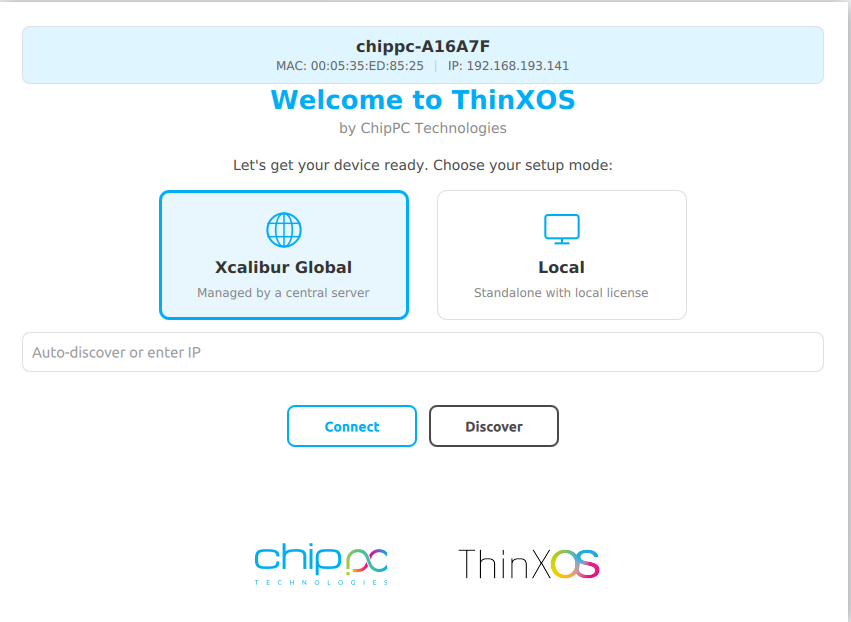
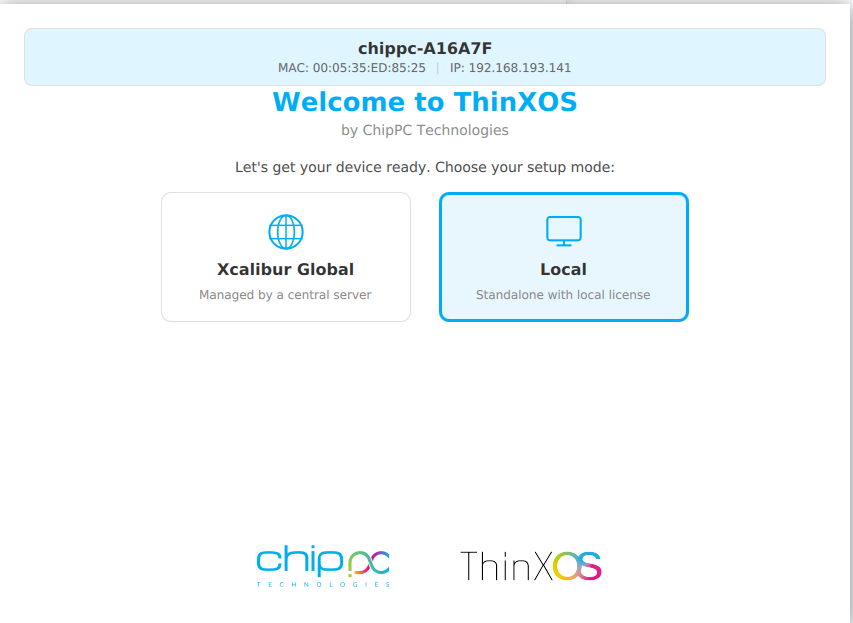
On first boot, the thin client runs ThinX OS Setup (ThinXOS Setup window) from the ChipPC client (client/licensemanager in the chippcapp sources). You choose how the device is licensed and managed.
Without Xcalibur (standalone / local license)
Select Local — Standalone with local license. The device talks to the ChipPC license server over HTTPS:
- Endpoint:
https://license.chippc.com(outbound TCP 443 must be allowed). - Device identity: serial string
ProcessorId-MAC(used for lookup and registration). - Automatic check: the wizard tries to fetch an existing license for this device.
- Register this PC: registers the device with the license server (extended warranty / support flow).
- License code: enter
XXXX-XXXX-XXXXand click Apply to bind a code to this device via the server.
If the server cannot be reached, use a code only when your process allows offline steps; otherwise fix DNS/firewall first.
With Xcalibur (managed)
Select Xcalibur Global — Managed by a central server. Enter your Xcalibur server address (hostname or IP) or use discovery.
- Connect: uses the value in the field. If the field is empty, discovery starts automatically.
- Discover: finds the Xcalibur server on the LAN. The client tries, in order: PSK discovery on
https://<IP>:1013/psk-discoverywhen you typed an IP, then UDP broadcast to port 1012, then a subnet scan on the same /24. - On success, the management URL is stored as
wss://<host>:1013/api/v1/ws(defaults applied when the port/path are omitted). - The client then activates and waits for license approval from the Xcalibur server.
Open on the network: UDP 1012 (broadcast discovery), TCP 1013 (HTTPS discovery and WSS management, depending on deployment), and 443 to license.chippc.com for standalone licensing.
For pool-based and MAC-based licenses uploaded and assigned in the Xcalibur console, see Licenses (Chapter 3). The first-boot wizard here is the on-device path before the agent is fully enrolled.
Au premier démarrage, l’assistant ThinX OS Setup (fenêtre du client ChipPC, sources licensemanager) permet de choisir le mode de licence.
Sans Xcalibur (licence locale)
Choisir Local — poste autonome. Connexion au serveur de licences ChipPC https://license.chippc.com (HTTPS 443). Identité ProcessorId-MAC, vérification automatique, bouton Register this PC, saisie du code XXXX-XXXX-XXXX puis Apply.
Avec Xcalibur
Choisir Xcalibur Global. Saisir l’adresse du serveur ou lancer Discover : PSK sur https://IP:1013/psk-discovery, diffusion UDP port 1012, puis balayage du sous-réseau. Puis activation / attente d’approbation côté serveur Xcalibur.
Beim ersten Start öffnet sich ThinX OS Setup. Local: Lizenzserver license.chippc.com (Port 443). Xcalibur Global: Verwaltungsserver; Discovery UDP 1012, HTTPS 1013 für PSK-Discovery.
En el primer arranque se abre ThinX OS Setup. Local: servidor de licencias license.chippc.com (443). Xcalibur Global: descubrimiento UDP 1012 y HTTPS 1013.
No primeiro arranque: ThinX OS Setup. Local: license.chippc.com (443). Xcalibur Global: descoberta UDP 1012, HTTPS 1013.
Al primo avvio: ThinX OS Setup. Local: license.chippc.com (443). Xcalibur Global: discovery UDP 1012, HTTPS 1013.
באתחול ראשון נפתח אשף ThinX OS Setup. מצב Local: שרת רישיונות license.chippc.com (443). מצב Xcalibur Global: גילוי UDP על פורט 1012 ו-HTTPS על 1013.

client/Logo-ThinXOS.png / ui.qrc)Logo officiel ThinX OS (identique à client/Logo-ThinXOS.png)Offizielles ThinX-OS-Logo (client/Logo-ThinXOS.png)Logotipo oficial (client/Logo-ThinXOS.png)Logótipo oficial (client/Logo-ThinXOS.png)Logo ufficiale (client/Logo-ThinXOS.png)לוגו רשמי (client/Logo-ThinXOS.png)licensemanager in chippcapp). Replace them if your build or language differs.
Captures ci-dessous : interface réelle de l’assistant ThinX OS Setup (licensemanager). Remplacez-les si votre build ou langue diffère.
Screenshots: echte Oberfläche von ThinX OS Setup (licensemanager).
Capturas: interfaz real del asistente ThinX OS Setup.
Capturas: interface real do assistente ThinX OS Setup.
Screenshot: interfaccia reale di ThinX OS Setup.
צילומי מסך תואמים לממשק האמיתי של ThinX OS Setup.
XXXX-XXXX-XXXX, Register this PCLokal — Lizenzserver, Code, RegistrierungLocal — código y registroLocal — código e registoLocale — codice e registrazioneמצב מקומי — רישום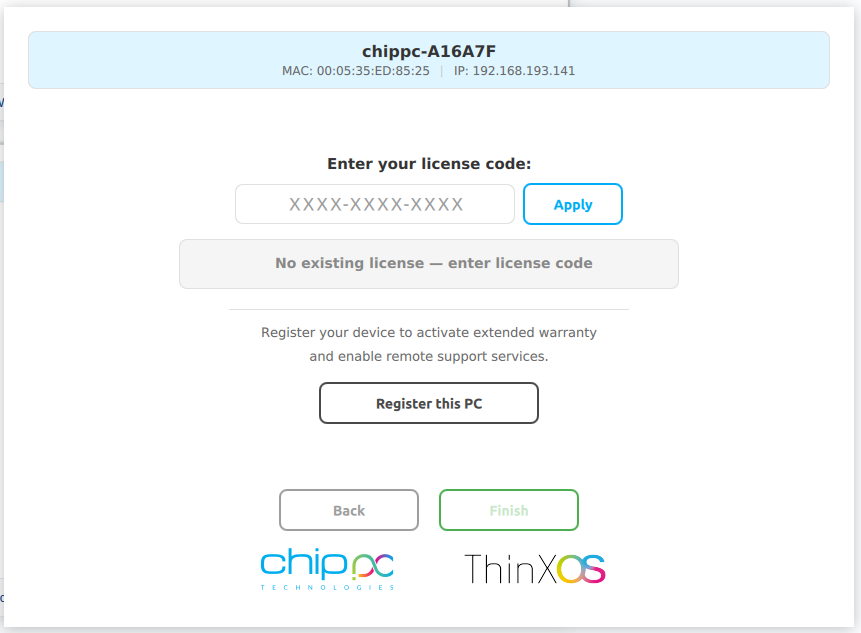
XXXX-XXXX-XXXX) and click Apply, or click Register this PC to activate extended warranty and remote supportLicence locale — saisir le code (XXXX-XXXX-XXXX) et cliquer Apply, ou Register this PC pour garantie et supportLokale Lizenz — Lizenzcode (XXXX-XXXX-XXXX) eingeben und Apply klicken, oder Register this PC für Garantie und SupportLicencia local — introducir código (XXXX-XXXX-XXXX) y pulsar Apply, o Register this PC para garantía y soporteLicença local — introduzir código (XXXX-XXXX-XXXX) e clicar Apply, ou Register this PC para garantia e suporteLicenza locale — inserire il codice (XXXX-XXXX-XXXX) e fare clic su Apply, o Register this PC per garanzia e supportoרישיון מקומי — הזן קוד רישיון (XXXX-XXXX-XXXX) ולחץ Apply, או לחץ Register this PC להפעלת אחריות ותמיכה מרחוק